CREATE TABLE sales.DimSalesPerson (
        SalesPersonID SERIAL primary key,
        SalesPersonAltID varchar(10) not null,
        SalesPersonName varchar(50)
);Populating a DW
Populating the enterprise data warehouse is an ongoing process.
- You have an initial load followed by periodic incremental loads. For example, you may load new data every day or every week.
- Rarely, a full refresh may be required in case of major schema changes or catastrophic failures.
- Generally, fact tables are dynamic and require frequent updating while dimension tables don’t
- change often. For example, lists of cities or stores are quite static, but sales happen every day.
Loading your Warehouse can also be a part of your ETL data pipeline that is automated using tools like Apache Airflow and Apache Kafka.
You can also write your own scripts, combining lower-level tools like Bash, Python, and SQL, to build your data pipeline and schedule it with cron.
And InfoSphere DataStage allows you to compile and run jobs to load your data.
Before populating your data warehouse, ensure that:
- Your schema has already been modeled.
- Your data has been staged in tables or files.
- And, you have mechanisms for verifying the data quality.
Initial Load
Now you are ready to set up your data warehouse and implement the initial load.
- You first instantiate the data warehouse and its schema, then create the production tables.
- Next, establish relationships between your fact and dimension tables,
- and finally, load your transformed and cleaned data into them from your staging tables or files.
Now that you’ve gone through the initial load, it’s time to set up ongoing data loads.
Ongoing Loads
- You can automate subsequent incremental loads using a script as part of your ETL data pipeline.
- You can also schedule your incremental loads to occur daily or weekly, depending on your needs.
- You will also need to include some logic to determine what data is new or updated in your staging area.
- Normally, you detect changes in the source system itself. Many relational database management systems have mechanisms for identifying any new, changed, or deleted records since a given date.
- You might also have access to timestamps that identify both when the data was first written and the date it might have been modified.
- Some systems might be less accommodating and you might need to load the entire source to your ETL pipeline for subsequent brute-force comparison to the target, which is fine if the source data isn’t too large.
Maintenance
Data warehouses need periodic maintenance, usually monthly or yearly, to archive data that is not likely to be used.
- You can script both the deletion of older data and its archiving to slower, less costly storage.
Let’s illustrate the process with a simplified example of manually populating a data warehouse with a star schema called ‘sales.’ We’ll assume that you’ve already instantiated the data warehouse and the ‘sales’ schema.
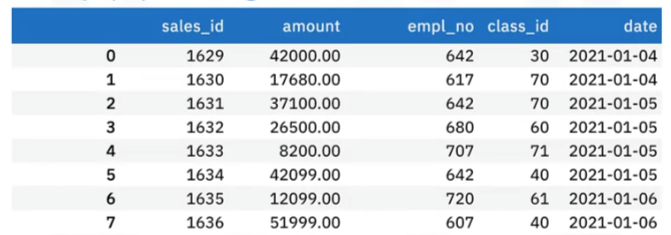
Here’s a sample of some auto sales transaction data from a fictional company called Shiny Auto Sales.
- You can see several foreign key columns, such as “sales ID,” which is a sequential key identifying the sales invoice number,
- “emp no,” which is the employee number, and
- “class ID,” which encodes the type of car sold, such as “small SUV.”
Each of these keys represents a dimension that points to a corresponding dimension table in the star schema.
- The “date” column is a dimension that indicates the sale date.
- The “amount” column is the sales amount, which happens to be the fact of interest.
- This table is already close to the form of a fact table. The only exception is the date column, which is not yet represented by a foreign “date ID” key.
Create Dimension Table
Let’s use PSQL, the terminal-based front end for PostGreSQL, to illustrate how you can create your dimension tables using the salesperson dimension as an example.
- Use the CREATE TABLE clause to create the “DimSalesPerson” table with the “sales” schema, along with
- “SalesPersonID” as a serial primary key,
- “SalespersonAltID”, as the salesperson’s employee number,
- and finally, a column for the salesperson’s name.
Now you can start populating the “DimSalesPerson” table, row by row.
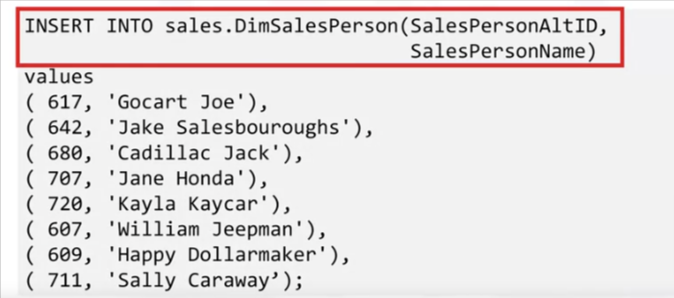
- You use an “insert into” clause on the “sales dot DimSalesPerson” table, specifying the “SalesPersonAltID” and “SalesPersonName” columns,
- and begin inserting values such as employee number 680, “Cadillac Jack.”
- You would similarly create and populate tables for the remaining dimensions.
You can view the table with an SQL statement:

Create Fact Table
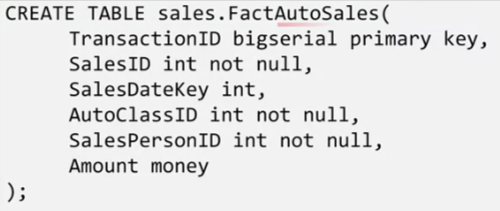
Now it’s time to create your sales fact table, using “CREATE TABLE”
Fact & Dimension Relations
Next, you proceed with setting up the relations between the fact and dimension tables of the sales schema.

- For example, you can apply the ALTER TABLE statement and the ADD CONSTRAINT clause to
- the “sales dot FactAutoSales” fact table to
- add “KVAutoClassID” as a foreign key relating “AutoClassID” to the same column name in the “sales dot DimAutoCategory” table using the REFERENCES clause.
- You would then use the same method to set up the relations for the remaining dimension tables.
Populate Fact Table
After defining all the tables and setting up the corresponding relations, it’s finally time to start populating your fact table using the sales data that you started with.
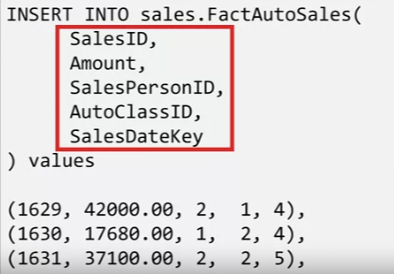
- You can use the INSERT INTO statement on “sales dot FactAutoSales,” specifying the column names “SalesID,” “Amount,” “SalesPersonID,” “AutoClassID,” and “SalesDateKey,” and entering rows of values such as 1629, 42000, 2, 1, and 4, which you would obtain using the auto sales data.
You can view the auto sales fact table .

Here you see the dollar amounts for individual auto sales, the primary key called “transactionID,” and the remaining columns, which are the foreign keys that you set up.
Example Project
In this project we will use pdAdmin to:
- Create production related database and tables in a PostgreSQL instance.
- Populate the production data warehouse byloading the tables from Scripts.
The database contains:
Create db
Left menu> right click database > create db > name it Production
Create Tables
Now, that you have your PostgreSQL service active and have created the Production database using pgAdmin, let’s go ahead and create a few tables to populate the database and store the data that we wish to eventually upload into it.
- Click on the Production database and in the top of the page go to Query tool and then click on Open File. Next a new page pops up called Select File. Click on Upload
- In the new blank page that appears drag and drop the star-schema.sql file inside the blank page. Once the star-schema.sql file is successfully loaded, click on the X
- Once you click on the X icon a new page appears with the file star-schema.sql. Select the star-schema.sql file from the list and click the Select tab
- Once the file opens up click on the Run option to execute the star-schema.sql file.
- Next, right-click on the Production database and click on the Refresh
- Repeat the same process with DimCustomer.sql, DimMonth.sql and FactBilling.sql
# Content of star-schema.sql
CREATE TABLE "DimCustomer"(customerid integer NOT NULL PRIMARY KEY,category varchar(10) NOT NULL,country varchar(40) NOT NULL,industry varchar(40) NOT NULL);


CREATE TABLE "DimMonth"(monthid integer NOT NULL PRIMARY KEY,year integer NOT NULL,month integer NOT NULL,monthname varchar(10) NOT NULL,quarter integer NOT NULL,quartername varchar(2) NOT NULL);


CREATE TABLE "FactBilling"(billid integer not null primary key,customerid integer NOT NULL,monthid integer NOT NULL,billedamount integer NOT NULL,
FOREIGN KEY (customerid) REFERENCES "DimCustomer" (customerid),FOREIGN KEY (monthid) REFERENCES "DimMonth" (monthid));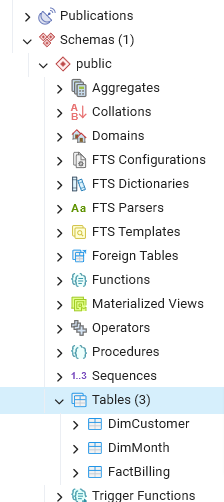
# Summary of Content of DimCustomer.sql which populates the table
INSERT INTO "DimCustomer"(customerid,category,country,industry) VALUES (1,'Individual','Indonesia','Engineering'),(614,'Individual','United States','Product Management'),(615,'Individual','China','Services'),(616,'Individual','Russia','Accounting'),(617,'Individual','Chile','Business Development'),(618,'Individual','Nicaragua','Human
# Summary of Content of DimMonth.sql which populates the table
INSERT INTO "DimMonth"(monthid,year,month,monthname,quarter,quartername) VALUES (20091, 2009, 1, 'Janauary', 1, 'Q1');
INSERT INTO "DimMonth"(monthid,year,month,monthname,quarter,quartername) VALUES (200910, 2009, 10, 'October', 4, 'Q4');
INSERT INTO "DimMonth"(monthid,year,month,monthname,quarter,quartername) VALUES (200911, 2009, 11, 'November', 4, 'Q4');
INSERT INTO "DimMonth"(monthid,year,month,monthname,quarter,quartername) VALUES (200912, 2009, 12, 'December', 4, 'Q4');# Summary of Content of FactBilling.sql which populates the table
INSERT INTO public."FactBilling"(billid,customerid,billedamount,monthid) VALUES (1,1,5060,20091);
INSERT INTO public."FactBilling"(billid,customerid,billedamount,monthid) VALUES (2,614,9638,20091),(3,615,11573,20091),(4,616,18697,20091),(5,617,944,20091),(6,618,3539,20091)Query DB
Count all rows in FactBilling
select count(*) from public."FactBilling";
Materialized View
Create a simple Materialized views named avg_customer_bill with fields customerid and averagebillamount.
CREATE MATERIALIZED VIEW  avg_customer_bill (customerid, averagebillamount) AS
(select customerid, avg(billedamount)
from public."FactBilling"
group by customerid
);
# RESPONSE
Query returned successfully in 199 msec.
Refresh Materialized View
REFRESH MATERIALIZED VIEW avg_customer_bill;

# RESPONSE
Query returned successfully in 185 msec.
Use View
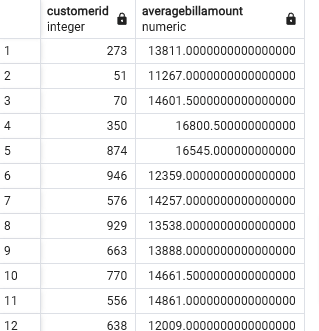
Find the customers whose average billing is more than 11000
select * from avg_customer_bill where averagebillamount > 11000;