wget https://cf-courses-data.s3.us.cloud-object-storage.appdomain.cloud/IBM-DB0110EN-SkillsNetwork/datasets/sakila/sakila_mysql_dump.sqlMySQL
Download and documentation is found here: MySQL
The following example will make use of the Sakila database used comes from the following source: https://dev.mysql.com/doc/sakila/en/ under New BSD license. It is a modified version of the database.
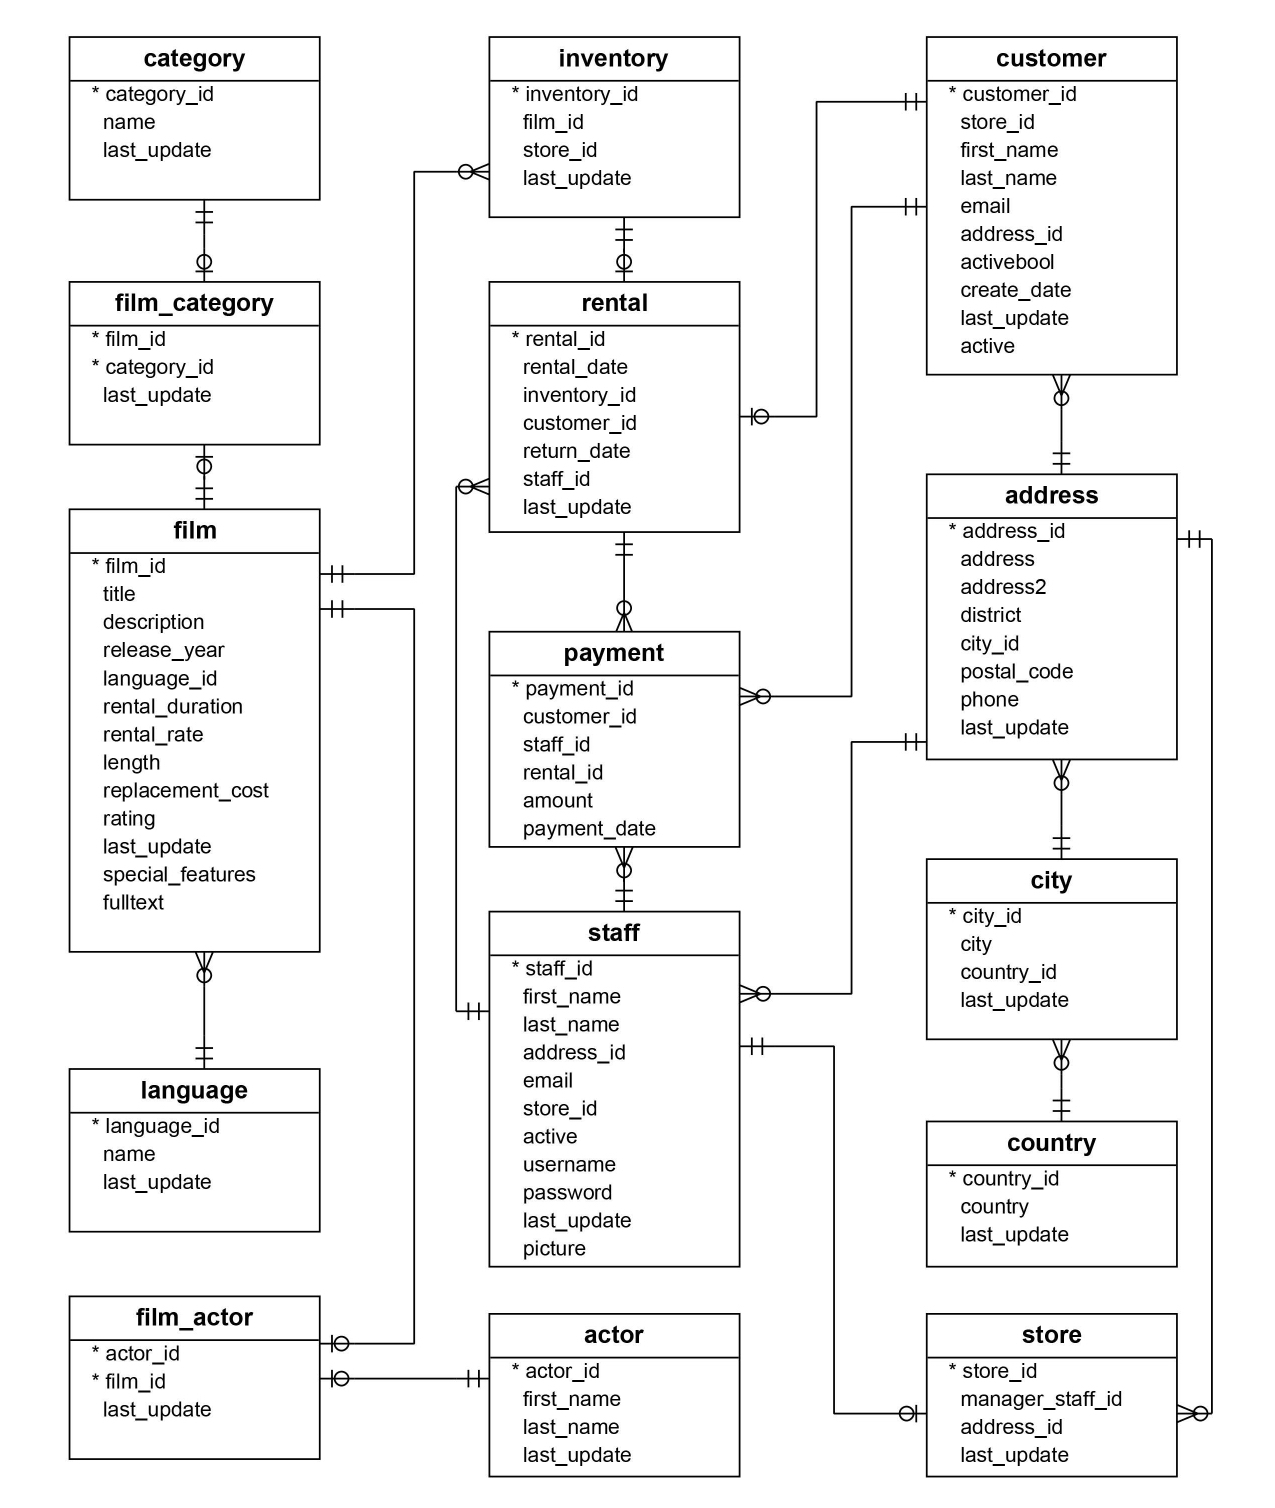
ERD
The following entity relationship diagram (ERD) shows the schema of the Sakila database:
CLI
In this first section we’ll use the MySQL command line interface (CLI) to create a database, restore the structure and contents of tables, explore and query tables, and finally, learn how to dump/backup tables from the database.
Steps
Terminal > New Terminal to open a terminal
Fetch the file to (in this instance: the cloud IDE)
This only applies to the IBM Cloud IDE I am using:
- Click the Skills Network extension button on the left side of the window.
- Open the DATABASES menu and click MySQL.
- Click Create. MySQL may take a few moments to start.
Initiate mysql cmd prompt
mysql --host=mysql --port=3306 --user=root --password
password: $%%^&^%%
tqEEmbeF4ADHUNHYIfb2hIgX
mysql>
List dbs
Verify the dbs are present and have been moved :
mysql> SELECT @@datadirCreate New Table
mysql> create database sakila;
Query OK, 1 row affected (0.02 sec)
Use Table
To use the table
mysql> use sakila;
database changed
Backup DB with Dump
Using the CLI we can backup everything you need to recreate the db in sql. This will include all the statements to recreate the entire db
mysqldump -u root employees > employeesbackup.sqlRestore DB from Dump
Restore the sakila mysql dump file (containing the sakila database table definitions and data) to the newly created empty sakila database.
A dump file is a text file that contains the data from a database in the form of SQL statements. This file can be imported using the command line with the following command:
mysql> source sakila_mysql_dump.sql;To restore the db dump outside the mysql command prompt use this
>mysql --host=mysql --port=3306 --user=root --password sakila < sakila_mysql_dump.sqlList All Tables
- We can use SHOW TABLES
mysql> SHOW FULL TABLES WHERE table_type = 'BASE TABLE';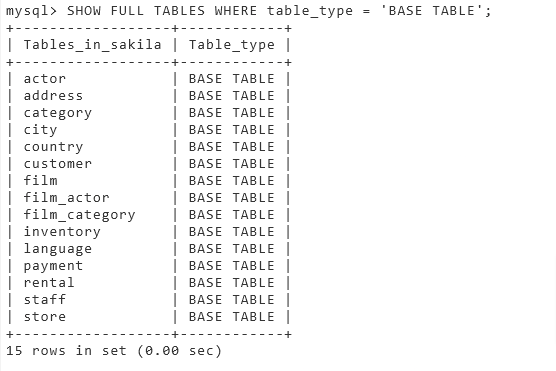
- The Table_type for these tables is BASE TABLE. BASE TABLE means that it is a table as opposed to a view (VIEW) or an
INFORMATION_SCHEMAview (SYSTEM VIEW).
List Columns & Query Table
- Explore the structure of the staff table using the command below in the terminal:
mysql> DESCRIBE staff;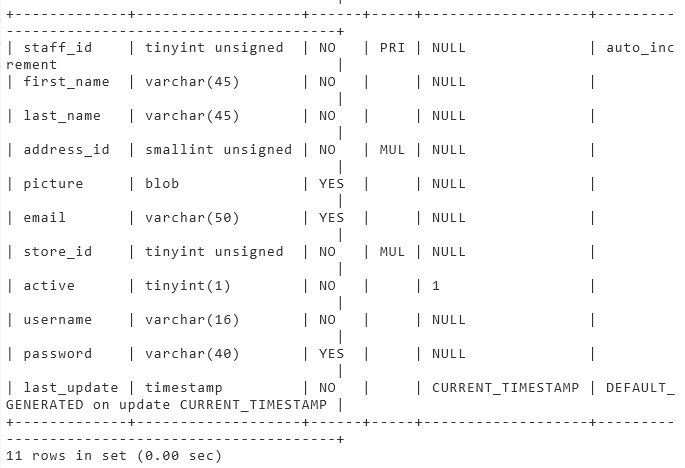
To understand the output, see the following table:
| Column Name | Definition |
|---|---|
| Field | Name of the column. |
| Type | Data type of the column. |
| Null | Displays YES if column can contain NULL values and NO if not. Notice how the primary key displays NO. |
| Key | Displays the value PRI if the column is a primary key, UNI if the column is a unique key, and MUL if the column is a non-unique index in which one value can appear multiple times. If there is no value displayed, then the column isn’t indexed or it’s indexed as a secondary column. Please note, that if more than one of these values applies to the column, the value that appears will be displayed based on the following order: PRI, UNI, and MUL. |
| Default | The default value of the column. If the column’s value has specifically been set as NULL, then the value that appears will be NULL. |
| Extra | Any additional information about a column. |
View All Records
mysql> SELECT * FROM staff;
Quit
mysql> \qDump/Backup Table
Let’s backup/dump the staff table from the database
>mysqldump --host=mysql --port=3306 --user=root --password sakila staff > sakila_staff_mysql_dump.sql
Enter password: tqEEmbeF4ADHUNHYIfb2hIgX
View the Dump
View the content of the dump within the terminal
>cat sakila_staff_mysql_dump.sql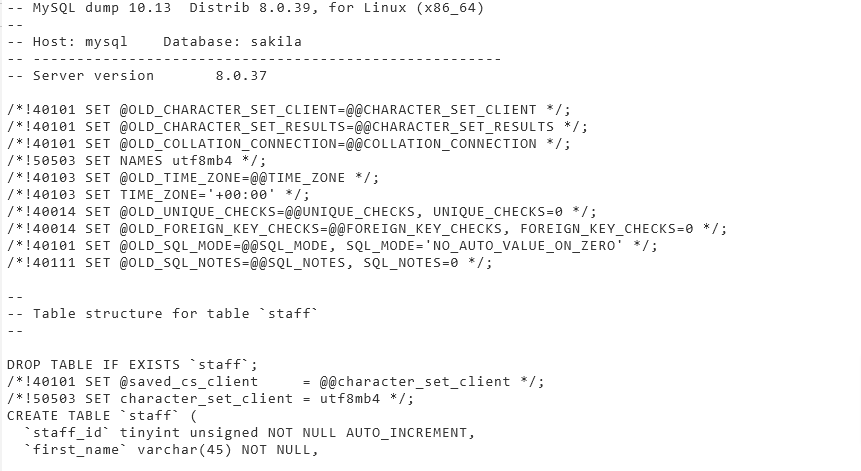
phpMyAdmin
Books database will be used. The following diagram shows the structure of the myauthors table from the Books database:
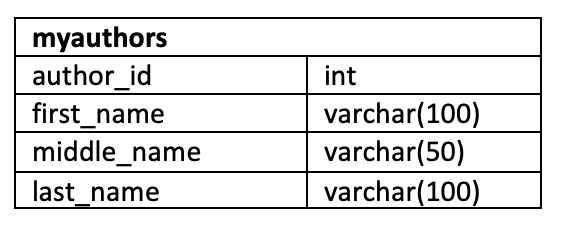
In the table:
- author_id is an integer
- first_name is a string that stores a maximum of 100 characters
- middle_name is a string that stores a maximum of 50 characters
- last_name is a string that stores a maximum of 100 characters
Create DB
Once you open phpMyAdmin you’ll see the databases tab

- Enter the name of db: Books
- The encoding will be left as utf8mb4_0900_ai_ci. UTF-8 is the most commonly used character encoding for content or data.
- Create
- A new page opens asking if you want to create a Table
Create Table
- myauthors for name
- 4 number of columns
- Create
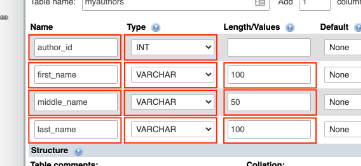
- A new page opens with 4 columns created with default INT data type
- Change them according to this image
- Save
- A new page showing the table structure appears

Load Data Manually
Sometimes, you may want to load a few data rows of data, but you may not have a SQL script on hand to do that. In this case, you can manually load the data into phpMyAdmin. Since this is a manual process, it is better for inserting a small amount of data rather than a large amount.
To load data manually, go to the Insert tab for the myauthors table. Enter data for 2 rows of the myauthors table as shown in the image below with highlighted boxes. Then click Go at the bottom.
The page defaults to 2 rows, you can increase the number at the bottom of the page, but we’ll only enter 2 rows, well partial rows actually

- Once you hit GO at the bottom the data is saved and the image above pops up showing the SQL statement that was used to insert the data along with the data itself
Browse the Data
- Click on the Browse Tab
- Here you’ll see the table and all the data in it
Load Data using SQL Script File
Even though we manually entered data into the table above, an SQL script was generated and executed that actually inserted the data in the db
Now we’ll import a script that was perhaps created by someone else, or perhaps was a dump created in another session with MySQL
Now you will use a SQL script to import the remainder of the myauthors table data. A SQL script file contains commands and statements that perform operations on your database, and can be useful when importing a large amount of data.
Download the SQL script below to your local computer:
Go to Import tab for the myauthors table. Click Choose File and load the mysql_table-myauthors_insert-data.sql file from your local computer storage. The rest of the settings can be left as they are because you are importing a SQL script that is encoded with UTF-8.
Then click IMPORT. Notification of import success will appear.

Here you’ll also notice in the left side tree menu the table myauthors is highlighted.
Click on Browse and you’ll see all the data that was imported.
P & Foreign Keys
ERD
Here is the ERD for the eBooks db we’ll be using

Download eBooks Dump
- Let’s first download the eBooks dump so we can create the db from it
Import
- Import Tab
- Choose File
- Format SQL
- Import
Primary Key
- Primary Keys: Creating a primary key on a table automatically creates an index on the key. You will create a primary key for the author table to identify every row in the table uniquely. You will set the author_id column of the author table as a primary key.
- In the tree view, click the authors table.
- Switch to the Structure tab and make sure you are inside the Table structure subtab.
- Check the author_id column.
- Click the Primary option at the bottom of the table
- Now you’ll see a gold key next to author_id in the Name column
Foreign Key
- Foreign keys: You will create a foreign key for the book_authors table by setting its author_id column as a foreign key to establish a relationship between the book_authors and authors tables.
- Note we are in the book_authors table now, the primary key author_id from the authors table will be used as the foreign key in the book_authors table
In the tree view, click the book_authors table. Switch to the Structure tab and make sure you are inside the
Relation viewsubtab.If necessary, click Add constraint to create a new foreign key constraint placeholder.
Fill in the placeholders as shown in the following image: Name it fk_author, Cascade, Restrict, column=author_id, db=eBooks, Table=authors, Column=author_id
Click Save.

- You will see the SQL generated for the action along with
- “Your SQL query has been executed successfully”
ALTER TABLE `book_authors` ADD CONSTRAINT `fk_author` FOREIGN KEY (`author_id`) REFERENCES `authors`(`author_id`) ON DELETE CASCADE ON UPDATE RESTRICT;Constraints
Definitions
Here are the definitions of the options for the constraints we used when we created the FK above:
Cascade
CASCADE means that when rows are deleted or updated in the parent table, the corresponding rows in the child table will also be deleted or updated.
Restrict
RESTRICT means that rows cannot be deleted or updated in the parent table if there are corresponding rows in the child table.
Auto-Increment
- Auto-increment: You will set the auto-increment feature for the primary key of the author table.
In the tree view, click the authors table. Switch to the Structure tab and make sure you are inside the Table structure subtab.
Check the author_id column.
Click the Change option.
Check A_I column option (A_I = Auto_Increment).
Click Save
Now in the structure view you’ll see AUTO_INCREMENT in the Extra column and the Null column to NO
Null Constraints
- Null constraints: You will restrict the first_name column of the authors table from having a NULL value.
In the tree view, click the authors table. Switch to the Structure tab and make sure you are inside the Table structure subtab.
Check the first_name column.
Click the Change option.
Uncheck the Null option.
Click Save
Now you’ll see in the structure view that the Default column has been updated to None and the Null column to NO
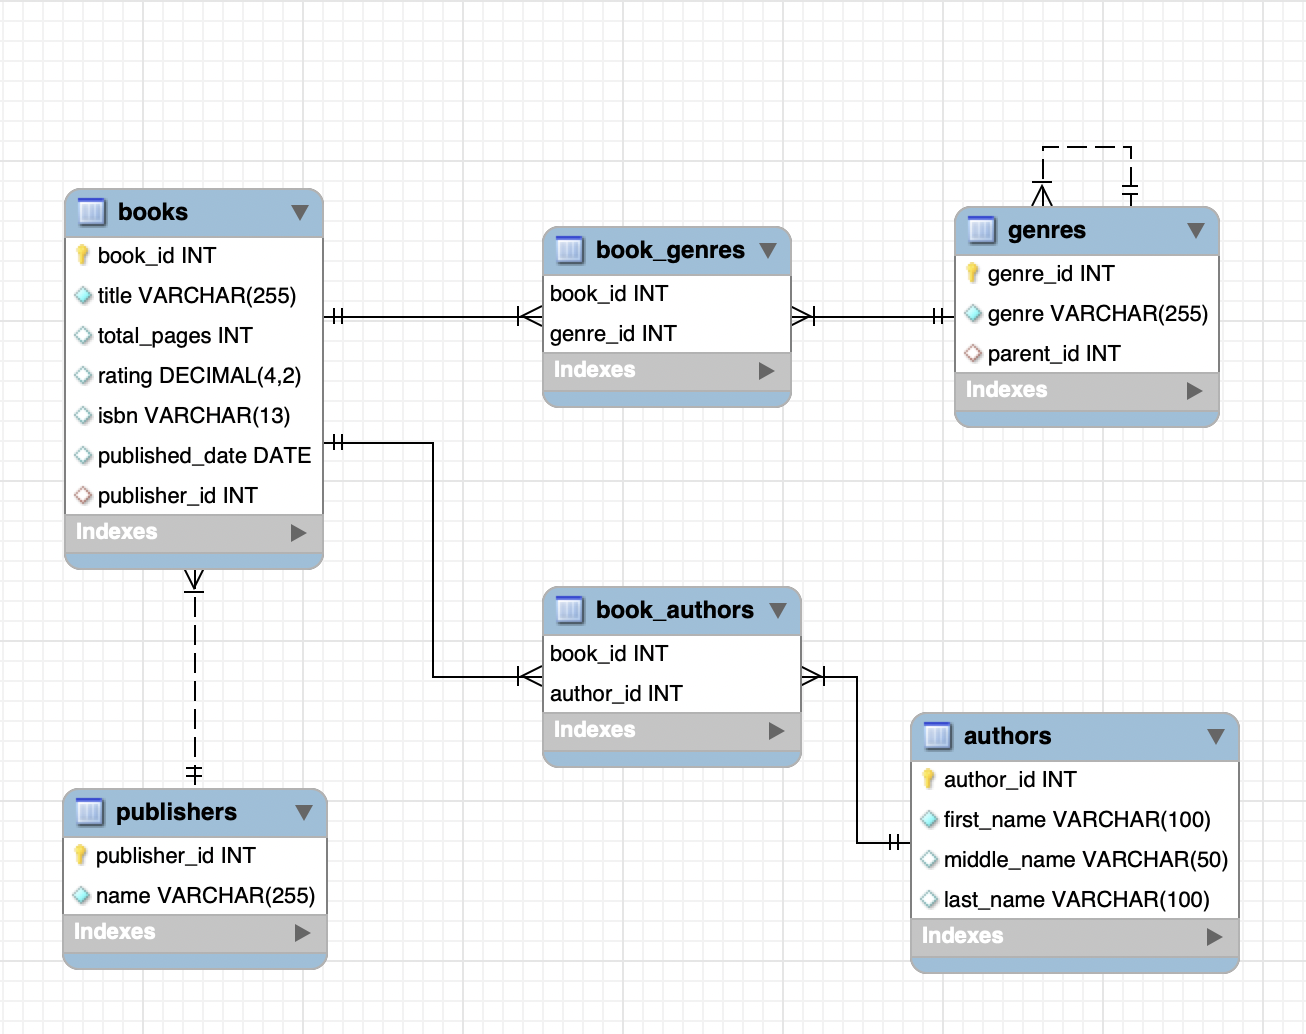
ERD
Here is the ERD diagram after we’ve completed the above actions. Compare it to the one at the start of this page
Install MySQL
- To interact with MySQL databases on your local machine, you need to install and start the MySQL server. To install the MySQL server run the following command.
- This command will prompt you to enter your password, and once you confirm, it will download and install the MySQL server package along with any necessary dependencies.
sudo apt-get install mysql-serverStart MySQL
sudo systemctl start mysqlThis command is used to start the MySQL service on a system running systemd, which is a system and service manager for Linux.
Here’s what each part of the command does:
- sudo: This prefix grants temporary administrative privileges to the command that follows it. It allows the user to execute the subsequent command with superuser (root) privileges.
- systemctl: This is a command-line utility used to manage systemd, which is a system and service manager for Linux operating systems. It allows users to start, stop, enable, disable, and manage services and other units.
- start: This subcommand of systemctl instructs systemd to start the specified service. In this case, mysql refers to the MySQL service.
Next, to access the MySQL CLI(Command Line Interface), you can use the command below in the terminal:
sudo mysql -u root -pHere’s what each part of the command does:
- mysql: This is the command used to launch the MySQL command-line interface.
- -u root: This option specifies the username to use when connecting to the MySQL server. In this case, it specifies that the root user should be used.
- -p: This option prompts the user to enter the password for the specified MySQL user (in this case, the root user). After entering the password, if it’s correct, the user gains access to the MySQL CLI with administrative privileges.
Save db to Alternate Directory
If you want to save the db to an alternate directory, other than the default one below, follow these steps
Default Directory
By default MySQL will save it’s dbs in the default directory: /var/lib/mysql
Create New Directory
Create the new directory you want to save the dbs to: sudo mkdir /project/mysql
I prefer to have all my dbs in the same main tree specially if I have multiple RDBMSes I am using, for example I’d have /project/mysql and /project/sqlite3 and /project/postgre….
Copy existing directory
If you have dbs you want to move over to this new directory, then use sudo cp -R /var/lib/mysql /project/mysql
- This will preserve the directory structure and file permissions and now I have the entire mysql directory under /project with all the files and dbs in it
Edit Config File
Now we need to edit the datadir option in the MySQL config file ( /etc/mysql/mysql.conf.d/mysqld.cnf ) to point to point to the new directory
- Look for
datadirinside the file and change its value from what it isdatadir = /var/lib/mysqltodatadir = /project/mysql
Restart MySQL
Note: all that work above should have been done after you had stopped MySQL. Now we need to restart it with: sudo service mysql start (on Ubuntu) or sudo systemctl start mysql (on RPM based systems)
List dbs
Verify the dbs are present and have been moved :
mysql> SELECT @@datadirCreate db
Create a new database world using the command below in the terminal
create database world;Connect to db
use world;Complete DB w Scripts
- Use the script files we downloaded above
source world_mysql_script.sql;Show Table
SHOW TABLES:Show Records
SELECT * FROM city WHERE countrycode='CAN';Update Table with Update Script
source world_mysql_update_A.sql;Show Records to verify
SELECT * FROM city WHERE countrycode='CAN';Quit MySQL
\qStop MySQL
sudo systemctl stop mysqlHere’s what each part of the command does:
systemctl: This is a command-line utility used to manage systemd, which is a system and service manager for Linux operating systems. It allows users to start, stop, enable, disable, and manage services and other units.
stop: This subcommand of systemctl instructs systemd to stop the specified service. In this case, mysql refers to the MySQL service.
Show Directory of DBs
If you want to know the location of the dbs created by MySQL: from the MySQL prompt
mysql> SELECT @@datadir;
+-----------------+
| @@datadir       |
+-----------------+
| /var/lib/mysql/ |
+-----------------+
1 row in set (0.00 sec)
List Dbs
mysql> SHOW DATABASES;
+--------------------+
| Database           |
+--------------------+
| information_schema |
| mysql              |
| performance_schema |
| sys                |
| world              |
+--------------------+
5 rows in set (0.13 sec)
See Backup & Restore in Data section for more