~$ dir_path="/mnt/d/data/MySQL"
~$ echo $dir_path
/mnt/d/data/MySQLDownload the zipped file to
MySQL Monitoring
Slow Queries Causes
Sometimes when you run a query, you might notice that the output appears much slower than you expect it to, taking a few extra seconds, minutes or even hours to load. There are many reasons for a slow query, but a few common ones include:
- The size of the database, which is composed of the number of tables and the size of each table. The larger the table, the longer a query will take, particularly if you’re performing scans of the entire table each time.
- Unoptimized queries can lead to slower performance. For example, if you haven’t properly indexed your database, the results of your queries will load much slower.
Each time you run a query, you’ll see output similar to the following:

As can be seen, the output includes the number of rows outputted and how long it took to execute, given in the format of 0.00 seconds. One built-in tool that can be used to determine why your query might be taking a longer time to run is the EXPLAIN statement.
EXPLAIN Q Performance
The EXPLAIN statement provides information about how MySQL executes your statement—that is, how MySQL plans on running your query.
With EXPLAIN, you can check if your query is pulling more information than it needs to, resulting in a slower performance due to handling large amounts of data.
EXPLAIN works with SELECT, DELETE, INSERT, REPLACE and UPDATE. When run, it outputs a table that looks like the following

As shown in the outputted table, with SELECT, the EXPLAIN statement tells you what type of select you performed, the table that select is being performed on, the number of rows examined, and any additional information.
In this case, the EXPLAIN statement showed us that the query performed a simple select (rather than, for example, a subquery or union select) and that 298,980 rows were examined (out of a total of about 300,024 rows).
The number of rows examined can be helpful when it comes to determining why a query is slow. For example, if you notice that your output is only 13 rows, but the query is examining about 300,000 rows—almost the entire table!—then that could be a reason for your query’s slow performance.
In the earlier example, loading about 300,000 rows took less than a second to process, so that may not be a big concern with this database. However, that may not be the case with larger databases that can have up to a million rows in them.
One method of making these queries faster is by adding indexes to your table.
How To Improve Performance
Indexing
Think of indexes like bookmarks. Indexes point to specific rows, helping the query determine which rows match its conditions and quickly retrieves those results.
- With this process, the query avoids searching through the entire table and improves the performance of your query, particularly when you’re using SELECT and WHERE clauses.
- There are many types of indexes that you can add to your databases, with popular ones being regular indexes, primary indexes, unique indexes, full-text indexes and prefix indexes.
| Type of Index | Description |
|---|---|
| Regular Index | An index where values do not have to be unique and can be NULL. |
| Primary Index | Primary indexes are automatically created for primary keys. All column values are unique and NULL values are not allowed. |
| Unique Index | An index where all column values are unique. Unlike the primary index, unique indexes can contain a NULL value. |
| Full-Text Index | An index used for searching through large amounts of text and can only be created for char, varchar and/or text datatype columns. |
| Prefix Index | An index that uses only the first N characters of a text value, which can improve performance as only those characters would need to be searched. |
Now, you might be wondering: if indexes are so great, why don’t we add them to each column?
Generally, it’s best practice to avoid adding indexes to all your columns, only adding them to the ones that it may be helpful for, such as a column that is frequently accessed. While indexing can improve the performance of some queries, it can also slow down your inserts, updates and deletes because each index will need to be updated every time. Therefore, it’s important to find the balance between the number of indexes and the speed of your queries.
In addition, indexes are less helpful for querying small tables or large tables where almost all the rows need to be examined. In the case where most rows need to be examined, it would be faster to read all those rows rather than using an index. As such, adding an index is dependent on your needs.
Selective Columns
When possible, avoid selecting all columns from your table. With larger datasets, selecting all columns and displaying them can take much longer than selecting the one or two columns that you need.
Avoid Leading Wildcards
Leading wildcards, which are wildcards ("%abc") that find values that end with specific characters, result in full table scans, even with indexes in place.
If your query uses a leading wildcard and performs poorly, consider using a full-text index instead. This will improve the speed of your query while avoiding the need to search through every row.
Union All Clause
When using the OR operator with LIKE statements, a UNION ALL clause can improve the speed of your query, especially if the columns on both sides of the operator are indexed.
This improvement is due to the OR operator sometimes scanning the entire table and overlooking indexes, whereas the UNION ALL operator will apply them to the separate SELECT statements.
Example 1 - Employees
We’ll use the employees db we’ve used before, here is the source for the db; https://dev.mysql.com/doc/employee/en/ under the CC BY-SA 3.0 License.
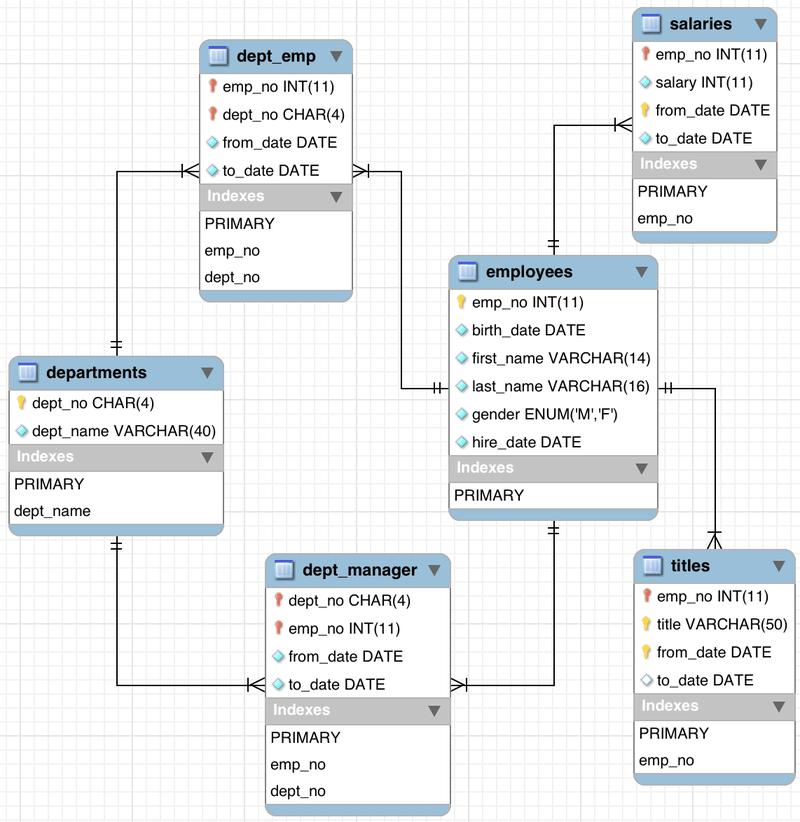
Load Data
Let’s start by moving the directory where we want the data downloaded to, or we can specify it in the wget statement. So let’s wget the data into the path we specified with dir_path
:~$ wget https://cf-courses-data.s3.us.cloud-object-storage.appdomain.cloud/IBM-DB0231EN-SkillsNetwork/datasets/employeesdb.zip -P $dir_path

# RESPONSE
--2024-10-02 10:14:01--  https://cf-courses-data.s3.us.cloud-object-storage.appdomain.cloud/IBM-DB0231EN-SkillsNetwork/datasets/employeesdb.zip
Resolving cf-courses-data.s3.us.cloud-object-storage.appdomain.cloud (cf-courses-data.s3.us.cloud-object-storage.appdomain.cloud)... 169.63.118.104
Connecting to cf-courses-data.s3.us.cloud-object-storage.appdomain.cloud (cf-courses-data.s3.us.cloud-object-storage.appdomain.cloud)|169.63.118.104|:443... connected.
HTTP request sent, awaiting response... 200 OK
Length: 36689578 (35M) [application/zip]
Saving to: ‘/mnt/d/data/MySQL/employeesdb.zip’

employeesdb.zip               100%[=================================================>]  34.99M  6.89MB/s    in 5.6s

2024-10-02 10:14:08 (6.26 MB/s) - ‘/mnt/d/data/MySQL/employeesdb.zip’ saved [36689578/36689578]
Unzip
We need to go to the directory of the zipped file or use the full path
~$ unzip $dir_path/employeesdb.zip -d $dir_path/employeesdb_extracted

# RESPONSE
Archive:  /mnt/d/data/MySQL/employeesdb.zip
   creating: /mnt/d/data/MySQL/employeesdb/
   creating: /mnt/d/data/MySQL/employeesdb/sakila/
  inflating: /mnt/d/data/MySQL/employeesdb/load_salaries2.dump
  inflating: /mnt/d/data/MySQL/employeesdb/test_versions.sh
  inflating: /mnt/d/data/MySQL/employeesdb/objects.sql
  inflating: /mnt/d/data/MySQL/employeesdb/load_salaries3.dump
  inflating: /mnt/d/data/MySQL/employeesdb/load_dept_emp.dump
  inflating: /mnt/d/data/MySQL/employeesdb/test_employees_sha.sql
  inflating: /mnt/d/data/MySQL/employeesdb/Changelog
   creating: /mnt/d/data/MySQL/employeesdb/images/
  inflating: /mnt/d/data/MySQL/employeesdb/employees_partitioned_5.1.sql
  inflating: /mnt/d/data/MySQL/employeesdb/test_employees_md5.sql
  inflating: /mnt/d/data/MySQL/employeesdb/README.md
  inflating: /mnt/d/data/MySQL/employeesdb/employees.sql
  inflating: /mnt/d/data/MySQL/employeesdb/load_titles.dump
  inflating: /mnt/d/data/MySQL/employeesdb/employees_partitioned.sql
  inflating: /mnt/d/data/MySQL/employeesdb/load_dept_manager.dump
  inflating: /mnt/d/data/MySQL/employeesdb/sql_test.sh
  inflating: /mnt/d/data/MySQL/employeesdb/load_departments.dump
  inflating: /mnt/d/data/MySQL/employeesdb/load_salaries1.dump
  inflating: /mnt/d/data/MySQL/employeesdb/show_elapsed.sql
  inflating: /mnt/d/data/MySQL/employeesdb/load_employees.dump
  inflating: /mnt/d/data/MySQL/employeesdb/sakila/README.md
  inflating: /mnt/d/data/MySQL/employeesdb/sakila/sakila-mv-data.sql
  inflating: /mnt/d/data/MySQL/employeesdb/sakila/sakila-mv-schema.sql
  inflating: /mnt/d/data/MySQL/employeesdb/images/employees.jpg
  inflating: /mnt/d/data/MySQL/employeesdb/images/employees.png
  inflating: /mnt/d/data/MySQL/employeesdb/images/employees.gif
Change Directories
Let’s go to the directory /employeedb where the files are so we can avoid using the path all the time
~$ cd $dir_path/employeesdb_extracted

yashaya@YASHAYA:/mnt/d/data/MySQL/employeesdb_extracted$ dir

Changelog                      images                  load_salaries1.dump  sakila                  test_versions.sh
README.md                      load_departments.dump   load_salaries2.dump  show_elapsed.sql
employees.sql                  load_dept_emp.dump      load_salaries3.dump  sql_test.sh
employees_partitioned.sql      load_dept_manager.dump  load_titles.dump     test_employees_md5.sql
employees_partitioned_5.1.sql  load_employees.dump     objects.sql          test_employees_sha.sql
Start MySQL
Create db
Connect to db
$ sudo mysql -u root -p
Enter password:
Welcome to the MySQL monitor.  Commands end with ; or \g...
Type 'help;' or '\h' for help. Type '\c' to clear the current input statement.


$ mysql> create database employeesdb;
Query OK, 1 row affected (0.07 sec)

$ mysql> use employeesdb;
Database changed
Populate db from Script
Now that we have the files extracted, we will
- Create a db named:
employeesfrom theemployees.sqlscript file - From ANOTHER terminal
- at the directory prompt from outside MySQL CLI
yashaya@YASHAYA:/mnt/d/data/MySQL/employeesdb_extracted$ sudo mysql -u root -p < employees.sql
Enter password:
INFO
CREATING DATABASE STRUCTURE
INFO
storage engine: InnoDB
INFO
LOADING departments
INFO
LOADING employees
INFO
LOADING dept_emp
INFO
LOADING dept_manager
INFO
LOADING titles
INFO
LOADING salaries
data_load_time_diff
00:00:32
Login to MySQL
- Since we are using Ubuntu we can use
sudo service mysql start - For RPM we can use
sudo systemctl start mysql - Since we populated the db from another terminal, we can go back to the MySQL CLI terminal or login to a new one
$ sudo systemctl start mysql  # or
$ sudo service mysql start

A:/mnt/d/data/MySQL/employeesdb_extracted$ sudo mysql -u root -p
Enter password:

Welcome to the MySQL monitor.  Commands end with ; or \g.
Your MySQL connection id is 9
Server version: 8.0.39-0ubuntu0.22.04.1 (Ubuntu)

Copyright (c) 2000, 2024, Oracle and/or its affiliates.

Oracle is a registered trademark of Oracle Corporation and/or its
affiliates. Other names may be trademarks of their respective
owners.

Type 'help;' or '\h' for help. Type '\c' to clear the current input statement.

mysql>
Connect to db
mysql> use employees
Reading table information for completion of table and column names
You can turn off this feature to get a quicker startup with -A

Database changed
List tables
mysql> show tables;
+----------------------+
| Tables_in_employees  |
+----------------------+
| current_dept_emp     |
| departments          |
| dept_emp             |
| dept_emp_latest_date |
| dept_manager         |
| employees            |
| salaries             |
| titles               |
+----------------------+
8 rows in set (0.00 sec)
Performance Check
Explain
The EXPLAIN statement, which provides information about how MySQL executes your statement, will offer you insight about the number of rows your query is planning on looking through. This statement can be helpful when your query is running slow. For example, is it running slow because it’s scanning the entire table each time?
- Let’s start with selecting all the data from the employees table
SELECT * FROM employees;

# The end of the table
| 499998 | 1956-09-05 | Patricia       | Breugel          | M      | 1993-10-13 |
| 499999 | 1958-05-01 | Sachin         | Tsukuda          | M      | 1997-11-30 |
+--------+------------+----------------+------------------+--------+------------+
300024 rows in set (0.15 sec)
Use Explain to see the details
mysql> EXPLAIN SELECT * FROM employees;
+----+-------------+-----------+------------+------+---------------+------+---------+------+--------+----------+-------+
| id | select_type | table     | partitions | type | possible_keys | key  | key_len | ref  | rows   | filtered | Extra |
+----+-------------+-----------+------------+------+---------------+------+---------+------+--------+----------+-------+
|  1 | SIMPLE      | employees | NULL       | ALL  | NULL          | NULL | NULL    | NULL | 299556 |   100.00 | NULL  |
+----+-------------+-----------+------------+------+---------------+------+---------+------+--------+----------+-------+
1 row in set, 1 warning (0.01 sec)
Notice how
EXPLAINshows that it is examining 299556 rows, almost the entire table!With a larger table, this could result in the query running slowly
So, how can we make this query faster? That’s where indexes come in!
Add Index
List Index
mysql> SHOW INDEX FROM employees;
+-----------+------------+----------+--------------+-------------+-----------+-------------+----------+--------+------+------------+---------+---------------+---------+------------+
| Table     | Non_unique | Key_name | Seq_in_index | Column_name | Collation | Cardinality | Sub_part | Packed | Null | Index_type | Comment | Index_comment | Visible | Expression |
+-----------+------------+----------+--------------+-------------+-----------+-------------+----------+--------+------+------------+---------+---------------+---------+------------+
| employees |          0 | PRIMARY  |            1 | emp_no      | A         |      299556 |     NULL |   NULL |      | BTREE      |         |               | YES     | NULL       |
+-----------+------------+----------+--------------+-------------+-----------+-------------+----------+--------+------+------------+---------+---------------+---------+------------+
1 row in set (0.03 sec)- Notice the only index is the primary key
- Remember that indexes for primary keys are created automatically, as we can see above. An index has already been created for the primary key, emp_no. If we think about this, this makes sense because each employee number is unique to the employee, with no NULL values.
Run Query
Now, let’s say we wanted to see all the information about employees who were hired on or after January 1, 2000. We can do that with the query
mysql> SELECT * FROM employees WHERE hire_date >= '2000-01-01';
+--------+------------+-------------+------------+--------+------------+
| emp_no | birth_date | first_name  | last_name  | gender | hire_date  |
+--------+------------+-------------+------------+--------+------------+
|  47291 | 1960-09-09 | Ulf         | Flexer     | M      | 2000-01-12 |
|  60134 | 1964-04-21 | Seshu       | Rathonyi   | F      | 2000-01-02 |
|  72329 | 1953-02-09 | Randi       | Luit       | F      | 2000-01-02 |
| 108201 | 1955-04-14 | Mariangiola | Boreale    | M      | 2000-01-01 |
| 205048 | 1960-09-12 | Ennio       | Alblas     | F      | 2000-01-06 |
| 222965 | 1959-08-07 | Volkmar     | Perko      | F      | 2000-01-13 |
| 226633 | 1958-06-10 | Xuejun      | Benzmuller | F      | 2000-01-04 |
| 227544 | 1954-11-17 | Shahab      | Demeyer    | M      | 2000-01-08 |
| 422990 | 1953-04-09 | Jaana       | Verspoor   | F      | 2000-01-11 |
| 424445 | 1953-04-27 | Jeong       | Boreale    | M      | 2000-01-03 |
| 428377 | 1957-05-09 | Yucai       | Gerlach    | M      | 2000-01-23 |
| 463807 | 1964-06-12 | Bikash      | Covnot     | M      | 2000-01-28 |
| 499553 | 1954-05-06 | Hideyuki    | Delgrande  | F      | 2000-01-22 |
+--------+------------+-------------+------------+--------+------------+
13 rows in set (0.07 sec)- As we can see, the 13 rows returned took about 0.17 seconds to execute. That may not seem like a long time with this table, but keep in mind that with larger tables, this time can vary greatly.
Explain
- With the
EXPLAINstatement, we can check how many rows this query is scanning
mysql> EXPLAIN SELECT * FROM employees WHERE hire_date >= '2000-01-01';
+----+-------------+-----------+------------+------+---------------+------+---------+------+--------+----------+-------------+
| id | select_type | table     | partitions | type | possible_keys | key  | key_len | ref  | rows   | filtered | Extra       |
+----+-------------+-----------+------------+------+---------------+------+---------+------+--------+----------+-------------+
|  1 | SIMPLE      | employees | NULL       | ALL  | NULL          | NULL | NULL    | NULL | 299556 |    33.33 | Using where |
+----+-------------+-----------+------------+------+---------------+------+---------+------+--------+----------+-------------+
1 row in set, 1 warning (0.00 sec)
This query results in a scan of 299,556 rows, which is nearly the entire table!
By adding an index to the hire_date column, we’ll be able to reduce the query’s need to search through every entry of the table, instead only searching through what it needs.
Create Index
- You can add an index with the following
- The
CREATE INDEXcommand creates an index called hire_date_index on the table employees on column hire_date.
mysql> CREATE INDEX hire_date_index ON employees(hire_date);
Query OK, 0 rows affected (0.68 sec)
Records: 0  Duplicates: 0  Warnings: 0
List Index
Let’s make sure the index is added
mysql> SHOW INDEX FROM employees;
+-----------+------------+-----------------+--------------+-------------+-----------+-------------+----------+--------+------+------------+---------+---------------+---------+------------+
| Table     | Non_unique | Key_name        | Seq_in_index | Column_name | Collation | Cardinality | Sub_part | Packed | Null | Index_type | Comment | Index_comment | Visible | Expression |
+-----------+------------+-----------------+--------------+-------------+-----------+-------------+----------+--------+------+------------+---------+---------------+---------+------------+
| employees |          0 | PRIMARY         |            1 | emp_no      | A         |      299556 |     NULL |   NULL |      | BTREE      |         |               | YES     | NULL       |
| employees |          1 | hire_date_index |            1 | hire_date   | A         |        5105 |     NULL |   NULL |      | BTREE      |         |               | YES     | NULL       |
+-----------+------------+-----------------+--------------+-------------+-----------+-------------+----------+--------+------+------------+---------+---------------+---------+------------+
2 rows in set (0.02 sec)
Run Query
Let’s run the same query
mysql> SELECT * FROM employees WHERE hire_date >= '2000-01-01';
+--------+------------+-------------+------------+--------+------------+
| emp_no | birth_date | first_name  | last_name  | gender | hire_date  |
+--------+------------+-------------+------------+--------+------------+
| 108201 | 1955-04-14 | Mariangiola | Boreale    | M      | 2000-01-01 |
|  60134 | 1964-04-21 | Seshu       | Rathonyi   | F      | 2000-01-02 |
|  72329 | 1953-02-09 | Randi       | Luit       | F      | 2000-01-02 |
| 424445 | 1953-04-27 | Jeong       | Boreale    | M      | 2000-01-03 |
| 226633 | 1958-06-10 | Xuejun      | Benzmuller | F      | 2000-01-04 |
| 205048 | 1960-09-12 | Ennio       | Alblas     | F      | 2000-01-06 |
| 227544 | 1954-11-17 | Shahab      | Demeyer    | M      | 2000-01-08 |
| 422990 | 1953-04-09 | Jaana       | Verspoor   | F      | 2000-01-11 |
|  47291 | 1960-09-09 | Ulf         | Flexer     | M      | 2000-01-12 |
| 222965 | 1959-08-07 | Volkmar     | Perko      | F      | 2000-01-13 |
| 499553 | 1954-05-06 | Hideyuki    | Delgrande  | F      | 2000-01-22 |
| 428377 | 1957-05-09 | Yucai       | Gerlach    | M      | 2000-01-23 |
| 463807 | 1964-06-12 | Bikash      | Covnot     | M      | 2000-01-28 |
+--------+------------+-------------+------------+--------+------------+
13 rows in set (0.00 sec)
The difference is quite evident! Rather than taking about 0.07 seconds to execute the query, it takes 0.00 seconds—almost no time at all.
Explain
We can use the EXPLAIN statement to see how many rows were scanned after the second index was added
mysql> EXPLAIN SELECT * FROM employees WHERE hire_date >= '2000-01-01';
+----+-------------+-----------+------------+-------+-----------------+-----------------+---------+------+------+----------+-----------------------+
| id | select_type | table     | partitions | type  | possible_keys   | key             | key_len | ref  | rows | filtered | Extra                 |
+----+-------------+-----------+------------+-------+-----------------+-----------------+---------+------+------+----------+-----------------------+
|  1 | SIMPLE      | employees | NULL       | range | hire_date_index | hire_date_index | 3       | NULL |   13 |   100.00 | Using index condition |
+----+-------------+-----------+------------+-------+-----------------+-----------------+---------+------+------+----------+-----------------------+
1 row in set, 1 warning (0.00 sec)
Under rows, we can see that only the necessary 13 columns were scanned, leading to the improved performance.
Under Extra, you can also see that it has been explicitly stated that the index was used, that index being hire_date_index based on the possible_keys column.
Remove Index
To remove the index use DROP then list all the index in the table
mysql> DROP INDEX hire_date_index ON employees;
Query OK, 0 rows affected (0.04 sec)
Records: 0  Duplicates: 0  Warnings: 0

mysql> SHOW INDEX FROM employees;
+-----------+------------+----------+--------------+-------------+-----------+-------------+----------+--------+------+------------+---------+---------------+---------+------------+
| Table     | Non_unique | Key_name | Seq_in_index | Column_name | Collation | Cardinality | Sub_part | Packed | Null | Index_type | Comment | Index_comment | Visible | Expression |
+-----------+------------+----------+--------------+-------------+-----------+-------------+----------+--------+------+------------+---------+---------------+---------+------------+
| employees |          0 | PRIMARY  |            1 | emp_no      | A         |      299556 |     NULL |   NULL |      | BTREE      |         |               | YES     | NULL       |
+-----------+------------+----------+--------------+-------------+-----------+-------------+----------+--------+------+------------+---------+---------------+---------+------------+
1 row in set (0.00 sec)
Union All
Sometimes, you might want to run a query using the OR operator with LIKE statements. In this case, using a UNION ALL clause can improve the speed of your query, particularly if the columns on both sides of the OR operator are indexed.
Run Query
This query searches for first names or last names that start with “C”. It returned 28,970 rows, taking about 0.09 seconds.
SELECT * FROM employees WHERE first_name LIKE 'C%' OR last_name LIKE 'C%';
| 499975 | 1952-11-09 | Masali         | Chorvat          | M      | 1992-01-23 |
| 499978 | 1960-03-29 | Chiranjit      | Kuzuoka          | M      | 1990-05-24 |
+--------+------------+----------------+------------------+--------+------------+
28970 rows in set (0.09 sec)
Explain
mysql> EXPLAIN SELECT * FROM employees WHERE first_name LIKE 'C%' OR last_name LIKE 'C%';
+----+-------------+-----------+------------+------+---------------+------+---------+------+--------+----------+-------------+
| id | select_type | table     | partitions | type | possible_keys | key  | key_len | ref  | rows   | filtered | Extra       |
+----+-------------+-----------+------------+------+---------------+------+---------+------+--------+----------+-------------+
|  1 | SIMPLE      | employees | NULL       | ALL  | NULL          | NULL | NULL    | NULL | 299556 |    20.99 | Using where |
+----+-------------+-----------+------------+------+---------------+------+---------+------+--------+----------+-------------+
1 row in set, 1 warning (0.00 sec)
Add Index
Add two indexes to first and last names
mysql> CREATE INDEX first_name_index ON employees(first_name);
Query OK, 0 rows affected (0.95 sec)
Records: 0  Duplicates: 0  Warnings: 0

mysql> CREATE INDEX last_name_index ON employees(last_name);
Query OK, 0 rows affected (0.95 sec)
Records: 0  Duplicates: 0  Warnings: 0
Run Query
It’s such a small table not much changed in time
mysql> SELECT * FROM employees WHERE first_name LIKE 'C%' OR last_name LIKE 'C%';

| 499966 | 1955-12-04 | Mihalis        | Crabtree         | F      | 1985-06-13 |
| 499975 | 1952-11-09 | Masali         | Chorvat          | M      | 1992-01-23 |
| 499978 | 1960-03-29 | Chiranjit      | Kuzuoka          | M      | 1990-05-24 |
+--------+------------+----------------+------------------+--------+------------+
28970 rows in set (0.09 sec)
Explain
Number of rows scanned didn’t change
mysql> EXPLAIN SELECT * FROM employees WHERE first_name LIKE 'C%' OR last_name LIKE 'C%';
+----+-------------+-----------+------------+------+----------------------------------+------+---------+------+--------+----------+-------------+
| id | select_type | table     | partitions | type | possible_keys                    | key  | key_len | ref  | rows   | filtered | Extra       |
+----+-------------+-----------+------------+------+----------------------------------+------+---------+------+--------+----------+-------------+
|  1 | SIMPLE      | employees | NULL       | ALL  | first_name_index,last_name_index | NULL | NULL    | NULL | 299556 |    20.99 | Using where |
+----+-------------+-----------+------------+------+----------------------------------+------+---------+------+--------+----------+-------------+
1 row in set, 1 warning (0.00 sec)
Union All
Let’s see if Union All will improve the performance. Lower number of rows but longer time
mysql> SELECT * FROM employees WHERE first_name LIKE 'C%' UNION ALL SELECT * FROM employees WHERE last_name LIKE 'C%';

| 488754 | 1958-11-26 | Zeydy          | Czap             | F      | 1993-06-10 |
| 492481 | 1953-01-16 | Chikara        | Czap             | M      | 1990-05-23 |
| 496850 | 1957-12-26 | Cheong         | Czap             | F      | 1994-10-26 |
+--------+------------+----------------+------------------+--------+------------+
29730 rows in set (0.13 sec)
Explain
Two select statements performed
mysql> EXPLAIN SELECT * FROM employees WHERE first_name LIKE 'C%' UNION ALL SELECT * FROM employees WHERE last_name LIKE 'C%';
+----+-------------+-----------+------------+-------+------------------+------------------+---------+------+-------+----------+-----------------------+
| id | select_type | table     | partitions | type  | possible_keys    | key              | key_len | ref  | rows  | filtered | Extra                 |
+----+-------------+-----------+------------+-------+------------------+------------------+---------+------+-------+----------+-----------------------+
|  1 | PRIMARY     | employees | NULL       | range | first_name_index | first_name_index | 58      | NULL | 20622 |   100.00 | Using index condition |
|  2 | UNION       | employees | NULL       | range | last_name_index  | last_name_index  | 66      | NULL | 34168 |   100.00 | Using index condition |
+----+-------------+-----------+------------+-------+------------------+------------------+---------+------+-------+----------+-----------------------+
2 rows in set, 1 warning (0.00 sec)
Leading Wild Card
Note that the entire table will be scanned with a leading wildcard 299556 as shown in the EXPLAIN table
SELECT * FROM employees WHERE first_name LIKE '%C';
| 498090 | 1954-09-02 | Marc       | Fujisawa         | F      | 1988-09-21 |
| 498599 | 1957-11-18 | Marc       | Awdeh            | M      | 1986-07-25 |
| 499661 | 1963-06-30 | Eric       | Demeyer          | M      | 1994-08-05 |
+--------+------------+------------+------------------+--------+------------+
1180 rows in set (0.09 sec)
Explain
mysql> EXPLAIN SELECT * FROM employees WHERE first_name LIKE '%C';
+----+-------------+-----------+------------+------+---------------+------+---------+------+--------+----------+-------------+
| id | select_type | table     | partitions | type | possible_keys | key  | key_len | ref  | rows   | filtered | Extra       |
+----+-------------+-----------+------------+------+---------------+------+---------+------+--------+----------+-------------+
|  1 | SIMPLE      | employees | NULL       | ALL  | NULL          | NULL | NULL    | NULL | 299556 |    11.11 | Using where |
+----+-------------+-----------+------------+------+---------------+------+---------+------+--------+----------+-------------+
1 row in set, 1 warning (0.00 sec)
Trailing Wild Card
SELECT * FROM employees WHERE first_name LIKE 'C%';
| 491115 | 1953-10-12 | Cullen         | Denti            | F      | 1992-09-13 |
| 492080 | 1961-08-02 | Cullen         | Whittlesey       | F      | 1997-01-12 |
| 495632 | 1958-05-16 | Cullen         | Pollock          | M      | 1992-01-21 |
+--------+------------+----------------+------------------+--------+------------+
11294 rows in set (0.03 sec)
Explain
mysql> EXPLAIN SELECT * FROM employees WHERE first_name LIKE 'C%';
+----+-------------+-----------+------------+-------+------------------+------------------+---------+------+-------+----------+-----------------------+
| id | select_type | table     | partitions | type  | possible_keys    | key              | key_len | ref  | rows  | filtered | Extra                 |
+----+-------------+-----------+------------+-------+------------------+------------------+---------+------+-------+----------+-----------------------+
|  1 | SIMPLE      | employees | NULL       | range | first_name_index | first_name_index | 58      | NULL | 20622 |   100.00 | Using index condition |
+----+-------------+-----------+------------+-------+------------------+------------------+---------+------+-------+----------+-----------------------+
1 row in set, 1 warning (0.00 sec)
Be Selective
In general, it’s best practice to only select the columns that you need. For example, if you wanted to see the names and hire dates of the various employees, you could show that with the following query
Query
SELECT * FROM employees;

| 499998 | 1956-09-05 | Patricia       | Breugel          | M      | 1993-10-13 |
| 499999 | 1958-05-01 | Sachin         | Tsukuda          | M      | 1997-11-30 |
+--------+------------+----------------+------------------+--------+------------+
300024 rows in set (0.12 sec)
Explain
mysql> EXPLAIN SELECT * FROM employees;
+----+-------------+-----------+------------+------+---------------+------+---------+------+--------+----------+-------+
| id | select_type | table     | partitions | type | possible_keys | key  | key_len | ref  | rows   | filtered | Extra |
+----+-------------+-----------+------------+------+---------------+------+---------+------+--------+----------+-------+
|  1 | SIMPLE      | employees | NULL       | ALL  | NULL          | NULL | NULL    | NULL | 299556 |   100.00 | NULL  |
+----+-------------+-----------+------------+------+---------------+------+---------+------+--------+----------+-------+
1 row in set, 1 warning (0.00 sec)
Limit Columns
SELECT first_name, last_name, hire_date FROM employees;

| Berhard        | Lenart           | 1986-04-21 |
| Patricia       | Breugel          | 1993-10-13 |
| Sachin         | Tsukuda          | 1997-11-30 |
+----------------+------------------+------------+
300024 rows in set (0.08 sec)

mysql> EXPLAIN SELECT first_name, last_name, hire_date FROM employees;
+----+-------------+-----------+------------+------+---------------+------+---------+------+--------+----------+-------+
| id | select_type | table     | partitions | type | possible_keys | key  | key_len | ref  | rows   | filtered | Extra |
+----+-------------+-----------+------------+------+---------------+------+---------+------+--------+----------+-------+
|  1 | SIMPLE      | employees | NULL       | ALL  | NULL          | NULL | NULL    | NULL | 299556 |   100.00 | NULL  |
+----+-------------+-----------+------------+------+---------------+------+---------+------+--------+----------+-------+
1 row in set, 1 warning (0.00 sec)
Example 2 - World db
Data
The World database used in this lab comes from the following source: https://dev.mysql.com/doc/world-setup/en/ under CC BY 4.0 License with Copyright 2021 - Statistics Finland.
Download db Script
$ dir_path="/mnt/d/data/MySQL"
~$ wget https://cf-courses-data.s3.us.cloud-object-storage.appdomain.cloud/IBM-DB0231EN-SkillsNetwork/datasets/World/world_mysql_script.sql -P $dir_path


--2024-10-02 16:49:59--  https://cf-courses-data.s3.us.cloud-object-storage.appdomain.cloud/IBM-DB0231EN-SkillsNetwork/datasets/World/world_mysql_script.sql
Resolving cf-courses-data.s3.us.cloud-object-storage.appdomain.cloud (cf-courses-data.s3.us.cloud-object-storage.appdomain.cloud)... 198.23.119.245
Connecting to cf-courses-data.s3.us.cloud-object-storage.appdomain.cloud (cf-courses-data.s3.us.cloud-object-storage.appdomain.cloud)|198.23.119.245|:443... connected.
HTTP request sent, awaiting response... 200 OK
Length: 389702 (381K) [application/x-sql]
Saving to: ‘/mnt/d/data/MySQL/world_mysql_script.sql.1’

world_mysql_script.sql.1      100%[=================================================>] 380.57K  --.-KB/s    in 0.1s

2024-10-02 16:49:59 (3.85 MB/s) - ‘/mnt/d/data/MySQL/world_mysql_script.sql.1’ saved [389702/389702]
Change Directories
Start MySQL
Create db
Connect to db
:~$ cd $dir_path
L$ sudo mysql -u root -p
Enter password:

Welcome to the MySQL monitor.  Commands end with ; or \g.
Your MySQL connection id is 8
Server version: 8.0.39-0ubuntu0.22.04.1 (Ubuntu)


mysql> CREATE DATABASE world;
mysql> USE world;
Reading table information for completion of table and column names
You can turn off this feature to get a quicker startup with -A

Database changed
mysql>
Populate db from Script
mysql> SOURCE world_mysql_script.sql;Show Tables
mysql> SHOW tables;
+-----------------+
| Tables_in_world |
+-----------------+
| city            |
| country         |
| countrylanguage |
+-----------------+
3 rows in set (0.00 sec)
Monitor Db
Use phpMyAdmin
Database monitoring refers to the tasks related to reviewing the operational status of your database. Monitoring is critical in maintaining the health and performance of your database because it’ll help you identify issues in a timely manner. In doing so, you’ll be able to avoid problems such as database outages that affect your users.
- On the phpMyAdmin homepage, you’ll notice a left sidebar and right panel.
- On the left sidebar, you’ll see all your databases, including the one we just created, world.
- For now, we’ll want to focus on the right panel to see more information about our servers and databases.
Select Status.
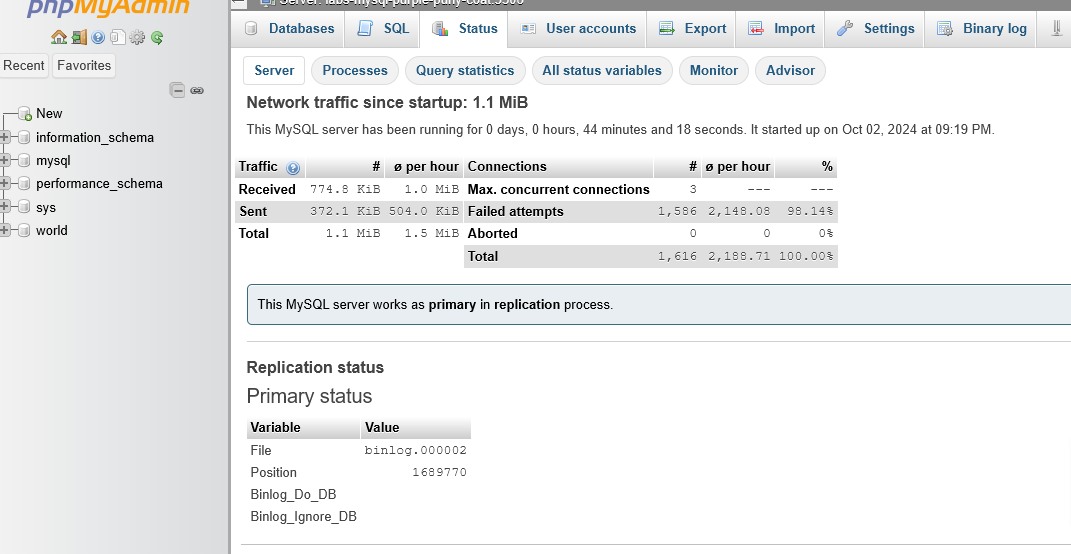
There are several subpages on the Status page: Server, Processes, Query Statistics, All Status Variables, Monitor and Advisor. These subpages will give you an inside look at the current processes on your server.
Monitor
- From the available sections, click Monitor.
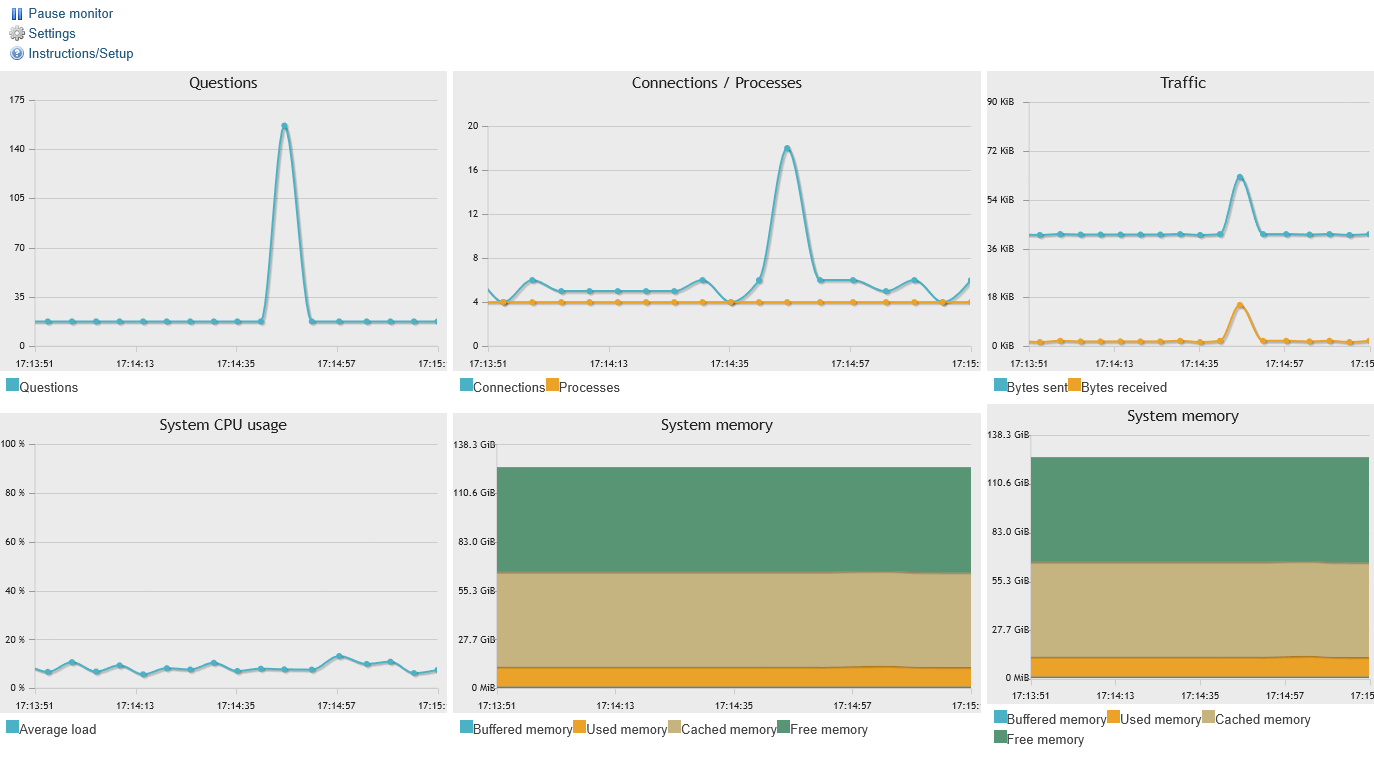
- When you first arrive at this page, you may only have three charts: Questions, Connections / Processes and Traffic. We can add a few more graphs to help track important metrics.
Add Chart
- Select Settings then Add chart.
- In the dialog box, you can choose a chart based on a status variable or select Preset chart. In this case, we’ll be adding two preset charts.
- First, let’s select System CPU Usage.
- Press Add chart to grid.
- Notice how there was a spike in your charts. Recall that Questions includes any queries run in the background by phpMyAdmin. In this case, the interaction was MySQL bringing up the System CPU Usage chart.
- Repeat this process to add the System memory chart.
Run Query
- From left pane > file tree menu
- Expand world db
- Right click on table: city
- Open in new tab
- This in effect will open a new tab by running a query:
SELECT * FROM city; - Click on the first tab to see the monitor/charts
- You’ll notice a spike for when we opened the other tab > when we ran that query above
- Note: I have no idea why it opened two charts for System Memory when I only opened one?
Status
The Status page is helpful in monitoring the health and performance of your server and database. Particularly with the Monitor page’s charts, you’ll be able to see real-time information on how your databases are doing. If there are unexpected irregularities, such as a sudden spike in queries or a high volume of incoming traffic, then that may point to a problem that needs to be attended to.
Optimize db
Database optimization refers to maximizing the speed and efficiency of retrieving data from your database. When you optimize your database, you are improving its performance, which can also improve the performance of slow queries. By optimizing your database, you’ll improve the experience for both yourself and your users.
We can see this in practice with the following scenario:
Imagine that you are the organizer of a sports tournament with a total of 120 participating teams. There’s three pieces of information that you’ve collected from each team: their (unique) team number, their three-letter team code for the system, and the date of the team’s creation.
Create Db
- To start, we’ll create a database in phpMyAdmin.
- On the left sidebar, select the New button to create a new database.
- On the Databases page, you can enter a Database name and leave it as the UTF-8 encoding. UTF-8 is the most commonly used character encoding for content or data.
- Let’s call our database tournament_teams.
Create Table
- Now, we can make a table. Let’s call it teams.
- Recall the information we want to store in this database: team number, team code and team creation date. We can make three columns for that.

We can now add in the column names and data types.
We’ll enter the following information into the table. Below are only the values that you’ll need to fill out. Anything else can be left as is:
| Name | Type | Length/Values |
|---|---|---|
| team_no | INT | |
| team_code | CHAR | 100 |
| creation_date | CHAR | 100 |
Since the team number is unique, with each of the 120 teams having their own number ranging from 1 to 120, that will be our primary key. We will set that later. It is a numeric data type, so we use INT for now.
The team code and creation date are both set as the CHAR data type. Notice that for the CHAR type, we must include the length of the value. To be safe, we’ve set that to 100.
You might be thinking that these data types aren’t the best choices for this database. You’d be correct! Given what we know, there are better choices for each of the entries, but let’s first take a look at an unoptimized database and how we can optimize it.
When all the values are entered, press Save.
Set PK
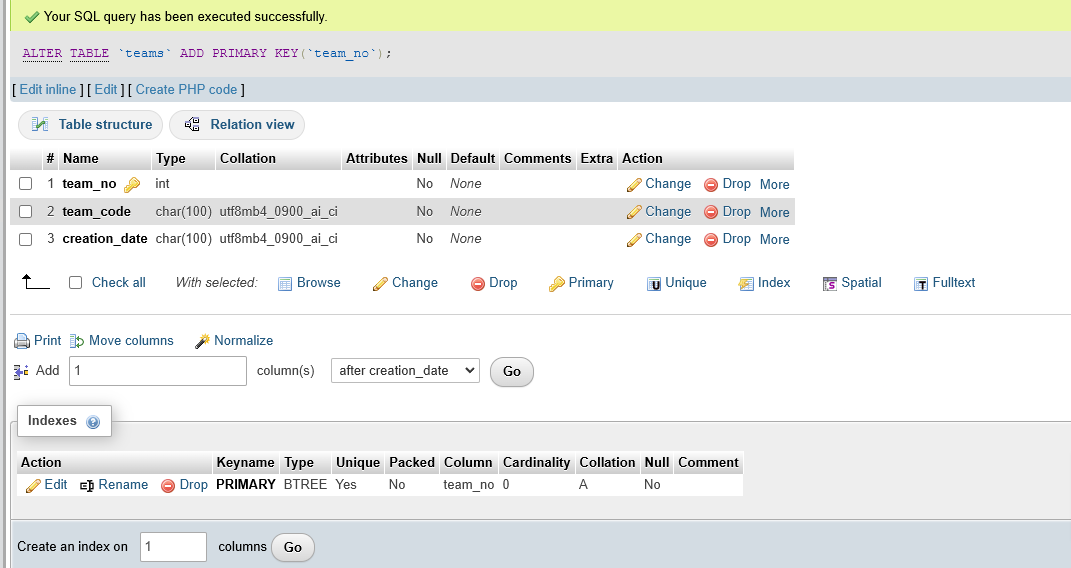
On the Structure page, select the checkbox next to team_no and click Primary.
Populate with Data
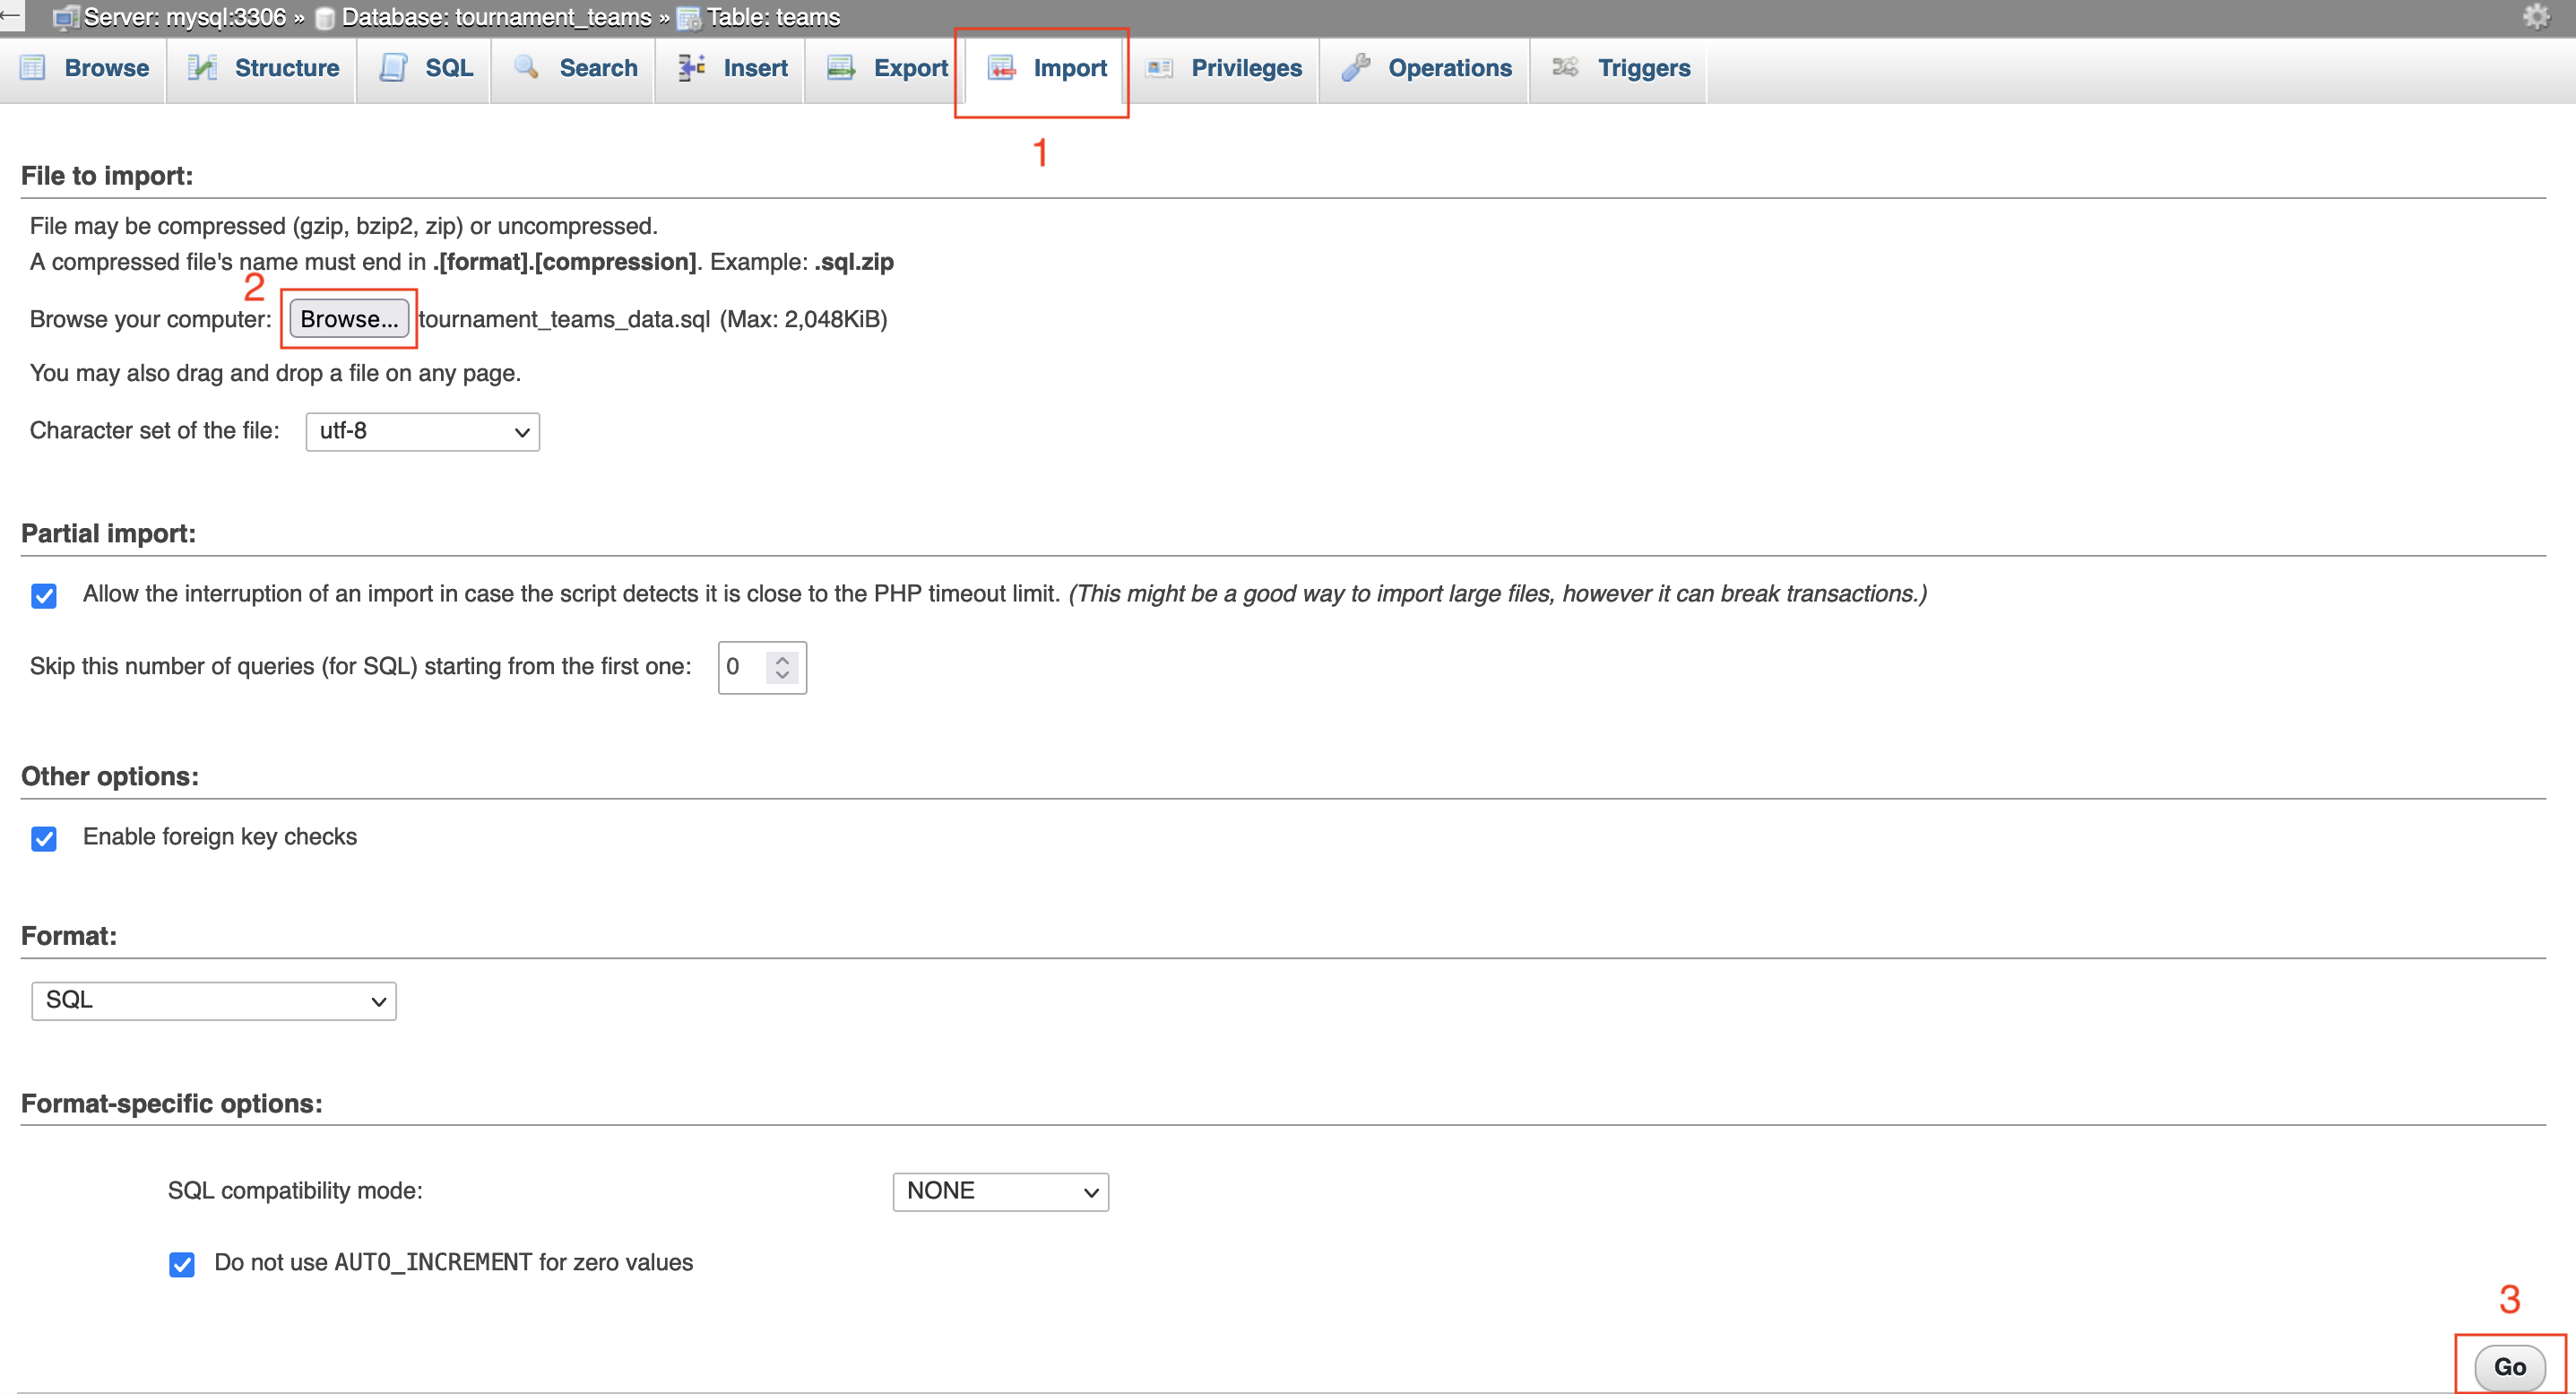
- Let’s import the data! This sample teams data has been prepared specifically for this lab and is composed of team numbers, team code names, and the creation date of these teams.
- You can download the file by clicking the following link: tournament_teams_data.sql.
- To import it, navigate to Import, then select Browse and find the file you just downloaded.
Review Data
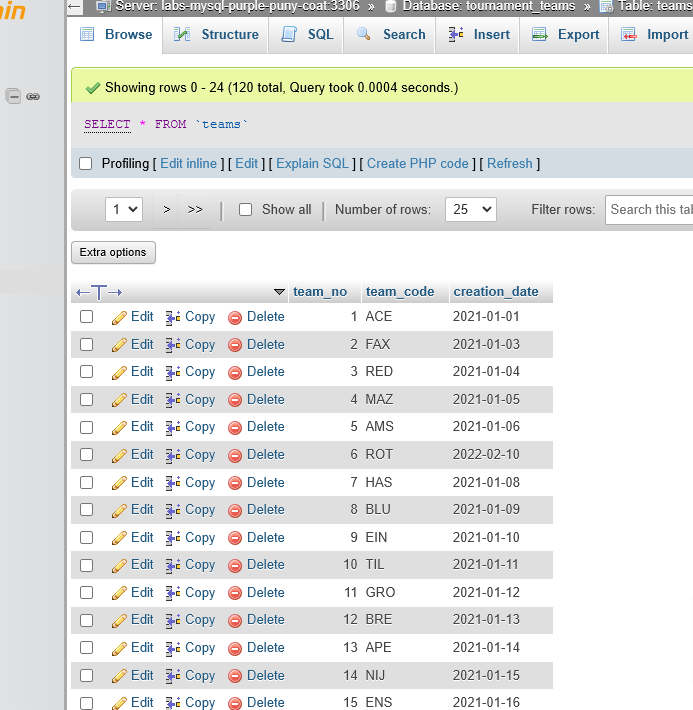
Now we can browse the data
The limit is implemented by phpMyAdmin, but you can easily show all rows by checking the Show all checkbox.
You will receive a warning asking if you’d like to see all rows. Since there’s only 120 rows in this example, you can click OK. In larger datasets, loading all the rows will likely crash your browser.
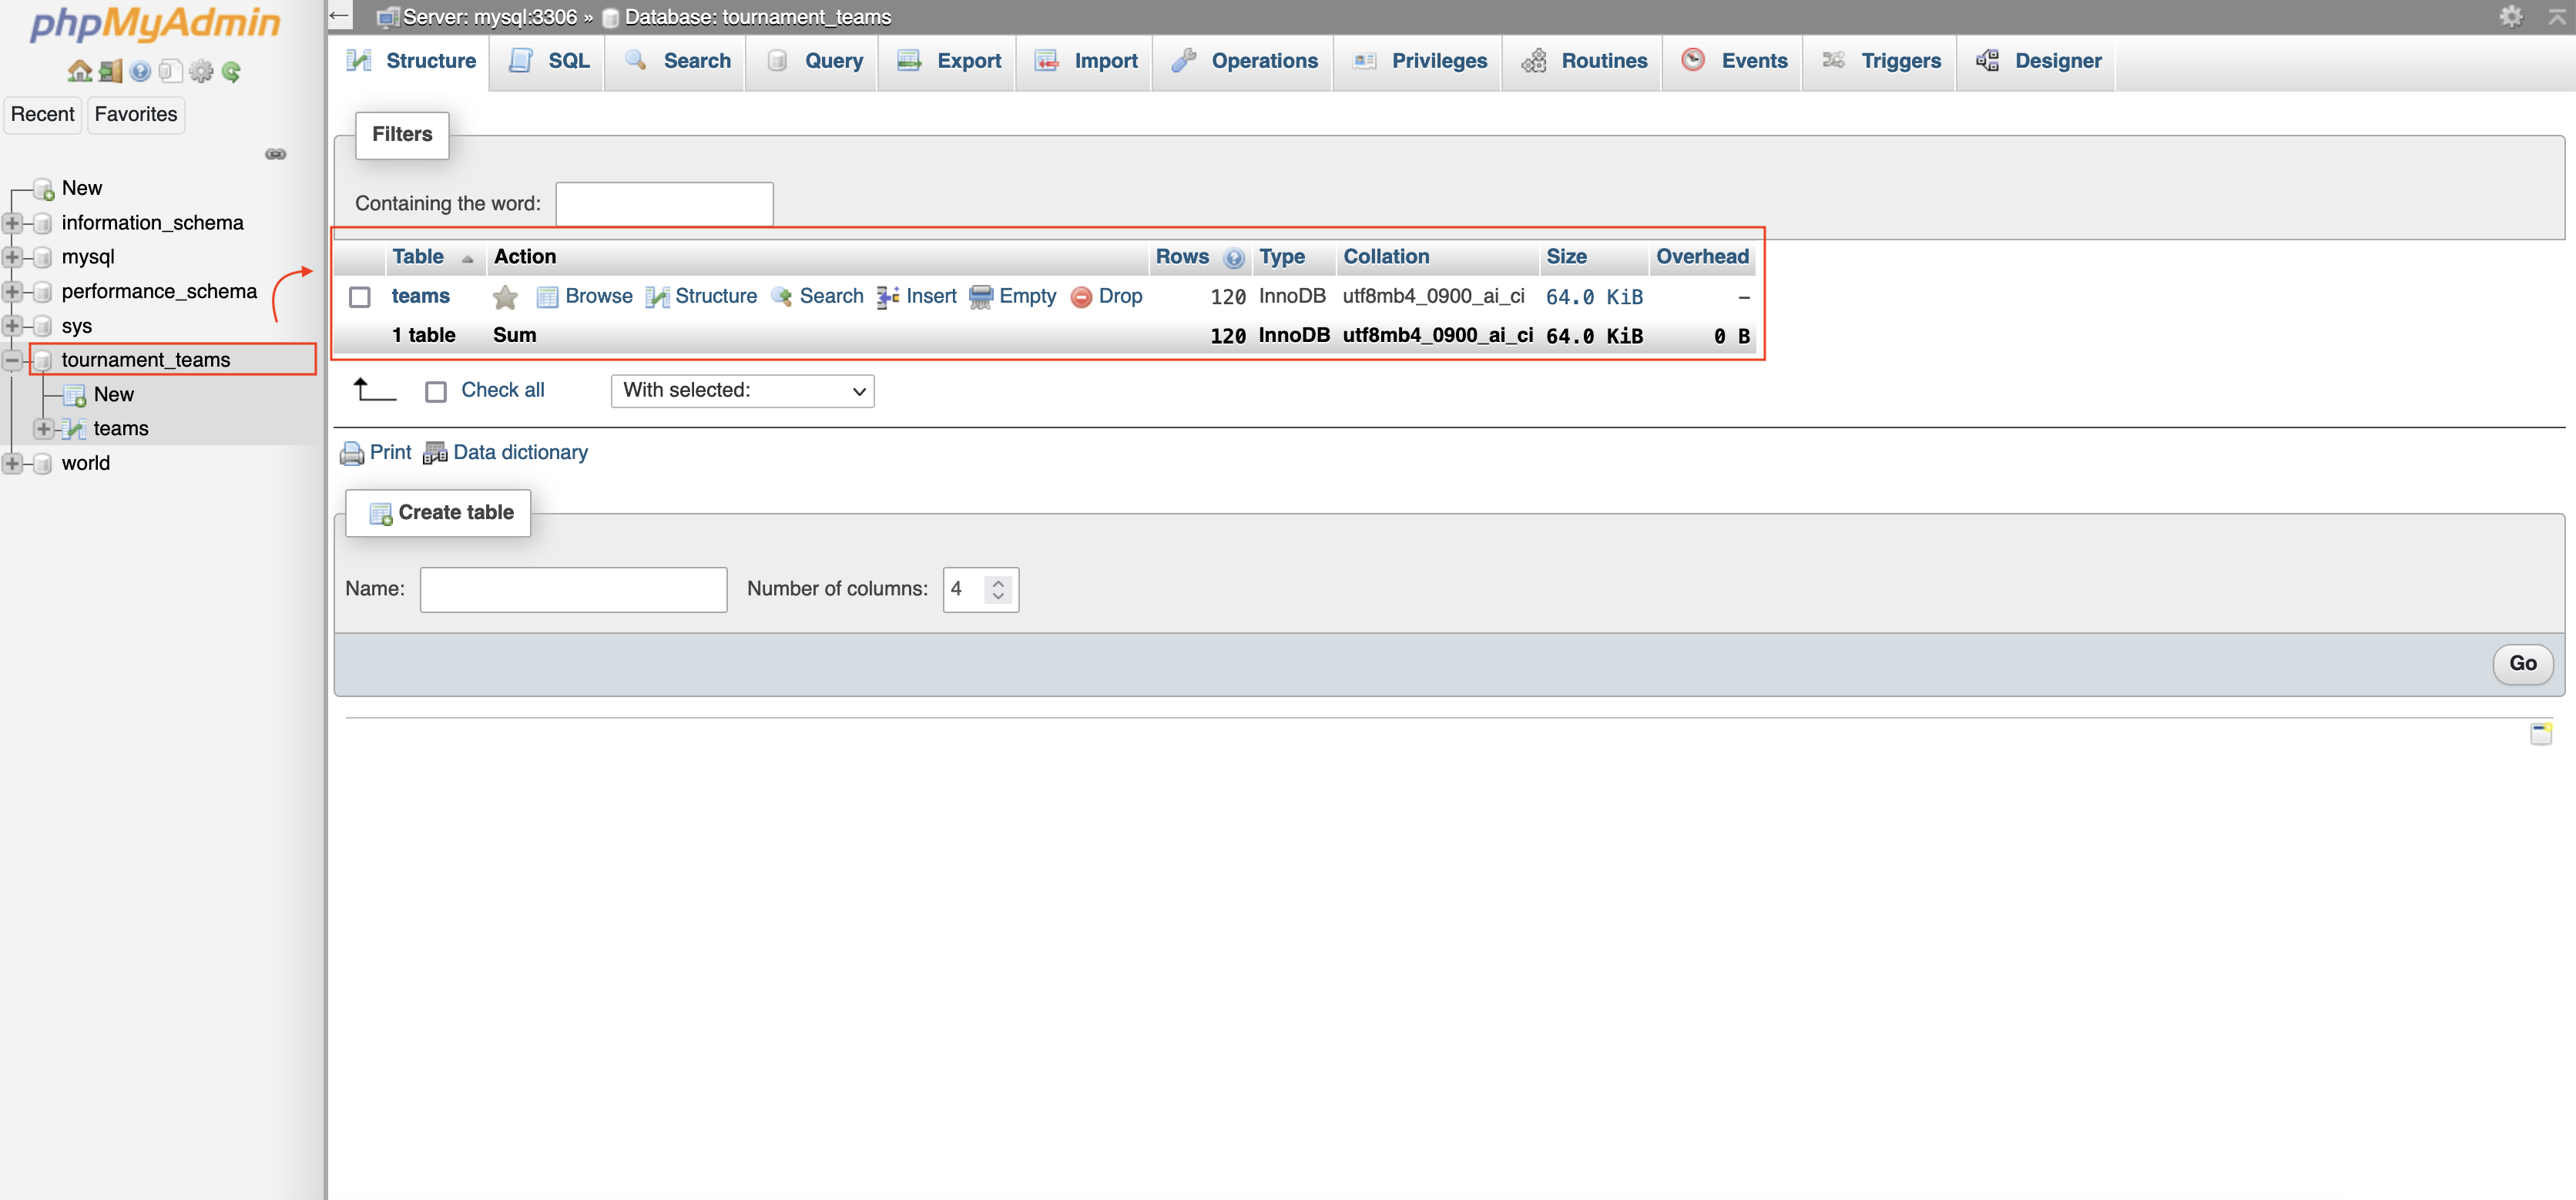
- Before we optimize it let’s go to structure and view this
Optimize
- Under Action for the teams table, select Structure. This will bring you back to the Structure page.
- Next to team_no, click Change. This function is helpful when you need to make adjustments to a column, for any reason.
- Let’s go to the teams table, click on structure
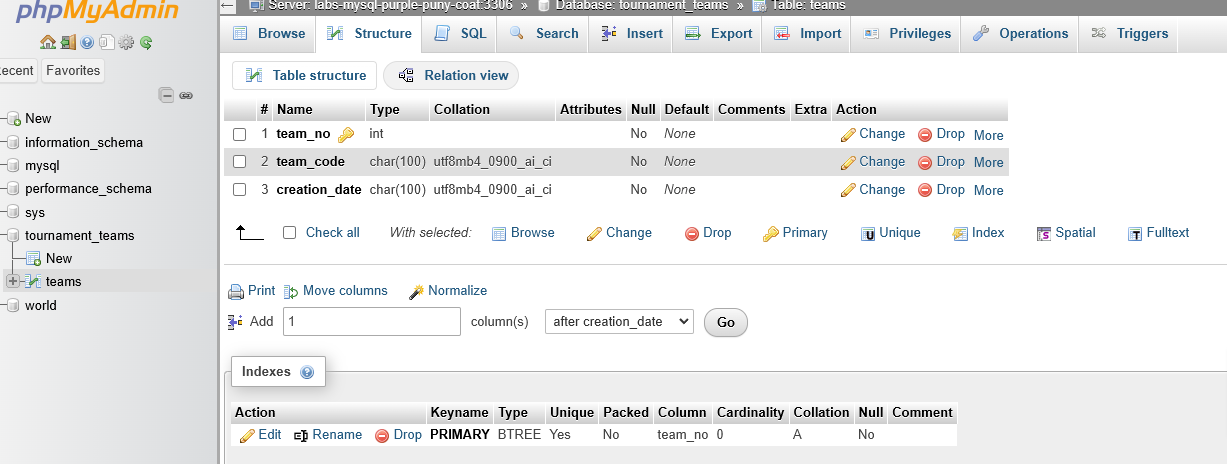
Change Type
- In this editor, let’s change the Type to one that would be better suited for this column
- If you were thinking TINYINT, you would be correct! As we know the maximum signed value of TINYINT is 127, this data type would work for our maximum number of 120 teams.
- Please note, if you’d like to add an unsigned integer type, you can do that under the Attributes column. In this case, we only have 120 teams, so we are within the TINYINT maximum signed value range.

- change data type for team_code
- change the creation_date

Browse the Table : We still have 120 rows
Review db: as you see the size is 10 KiB now

Optimize More
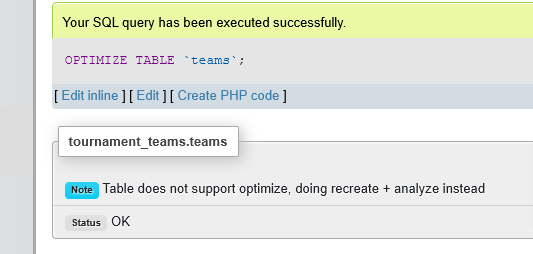
- We can take optimization a step further by selecting the teams table and, in the dropbox, selecting optimize table.
- This is equivalent to performing the
OPTIMIZE TABLEfunction in the command-line interface. - This command reorganizes the table data and indexes to reduce storage and make accessing the table more efficient.
- The exact changes made to the table depend on the storage engine in use.
- With the db selected, click on the box next to teams table
- Choose Optimize Table
- With the InnoDB engine, which is what we are currently using, the table is actually rebuilt, with the index statistics updated to free unused space.
